---
title: "Managed Firewall Services"
slug: "managed-firewall"
updated: 2023-12-29T19:13:25Z
published: 2023-12-29T19:13:25Z
canonical: "help.ena.com/managed-firewall"
---
> ## Documentation Index
> Fetch the complete documentation index at: https://help.ena.com/llms.txt
> Use this file to discover all available pages before exploring further.
# Managed Firewall Services (formerly ENA NetShield and ENA NetShield UTM)
## User Access
User access should be granted during turn up. If team members need access to the firewall, please contact [CTAC](https://www.ena.com/contact-us/customer-support/) or your Account Services Manager to ensure access is granted. Any team member approved by the customer network administrator may be granted access.
NoteThe Managed Firewall service does not have varied levels of user rights at this time. Everyone has read/write permissions once granted access.
## Getting Started
[Video](https://cdn.us.document360.io/ed04ecbf-0868-4e77-a11e-6df8b843143d/Images/Documentation/ENANetshieldUTMPortalOrientationv2.mp4?sv=2026-02-06&spr=https&st=2026-11-12T13%3A05%3A22Z&se=2026-11-12T14%3A05%3A22Z&sr=c&sp=r&sig=IRMSvNqjFWbxSho%2FmeQifMS1CVGBoOJhoxOh9hRBN%2Fc%3D)
### Logging In
1. Point your browser to [my.ena.com](https://my.ena.com/).
2. Enter your my.ena.com credentials.
3. Select **Managed Firewall Services (formerly ENA** **NetShield).**
### Lock/Unlock Functionality
This is accomplished with the **Lock** function in the top right of your portal. Upon logging in, you will be authenticated, but the workspace is unlocked. When working in an unlocked workspace, you will have read-only access to the portal. You will not be able to create or edit objects or policies. You will be able to run reports, view logs, and view policies.
NoteWhen locked, the workspace will indicate which user has control in the top right-hand side of the screen. If you need help unlocking a workspace, contact [CTAC](https://www.ena.com/contact-us/customer-support/) to force unlock another user.
### Save & Install
NoteUntil you have clicked **Save**, all changes made will be lost if you are logged out.NoteUntil you have clicked **Install**, no changes to your firewall will be in effect, only saved in your workspace and pending install.
The portal allows any user to build changes without actually committing them immediately to the Firewall to take effect. When building changes, **Create** means that you’ve drafted new objects or policies. **Save** means that those drafts are saved to your workspace and will be there even if you get logged out. **Install** means the changes are actually pushed to the firewall and will take effect.
Remember, you may have other team members managing your firewall or ENA by Zayo may be helping on other projects and changes with your firewall. If you leave your workspace saved and your uninstalled changes are pending in your workspace, when anyone clicks **Install**, all changes will be pushed – whether you meant them to or not. It is recommended installing your changes as you go.
If undesired changes are pushed, those can be deleted or deactivated (depending on the type of change) from the firewall or you can call [CTAC](https://www.ena.com/contact-us/customer-support/) to return to a previous state version.
## Your Dashboard
In the top left of the Managed Firewall portal, you see **Workspace** and **Device**. The name should be familiar – referencing your organization or a specific site. Most customers will have one **Device** listed. Some customers may have custom network designs requiring multiple devices and multiple workspaces, in this case multiple devices may be available.
If your organization does have multiple devices, most policy creation can be applied across both firewalls simultaneously. The situation to exercise caution is when building NAT – if you have questions about NAT for dual egress, please contact [CTAC](https://www.ena.com/contact-us/customer-support/).
In the top right are controls to lock your workspace. You have read-only access to your firewall until you’ve locked the workspace. Only one user may lock the workspace at any given time. If the workspace is locked by someone else, you should be able to see the user currently holding the controls.
If you need to manage your firewall but cannot unlock the workspace, contact [CTAC](https://www.ena.com/contact-us/customer-support/) for help forcing an unlock.
All graphs provided on your dashboard may be viewed in chart or table format with the addition of map format for the Countries data. All charts/tables are exportable in PNG, PDF, SVG, and CSV formats.
## Reports and Monitoring
### Overview
The **Reports & Monitoring** section provides granular detail on both real-time and historical network activity. There are several sections to this part of your portal. For any questions, requests for custom reporting, or other logging and reporting needs, please contact [CTAC](https://www.ena.com/contact-us/customer-support/).
Available reports include:
- **Reports**: Templated reports you may run at any time. All generated reports will be stored and can be exported.
- **Event details**: Real-time monitoring of triggered events that allow you to drill down into the originating device details.
- **Traffic History**: Pre-filtered view of logs for easy searching.
- **Live Logs**: Real-time log flow for the last 5 minutes. Flow can be paused to help with problem-solving.
- **Log Export**: Log data reaching back approximately two weeks. Data can be filtered and exported as needed.
- **Site-to-Site VPN**: Monitoring of any site-to-site VPNs that have been established.
- **Remote Access VPN**: Monitoring of any active remote access VPNs created as part of your Managed Firewall service
### Log Views & Troubleshooting
If you’re looking for specific log activity in the very recent past, the best place to begin is the **Log History** tab within the **Reports & Monitoring** section. Here, you can search for a log by keyword, by device, by event or traffic type, or by narrowing down the time of an event.
NoteYour log history on myENA will only return log traffic up to 7 days old. If you need logs from further back in history, please contact [CTAC](https://www.ena.com/contact-us/customer-support/) so that a report can be run. ENA by Zayo does not hold logs indefinitely and will only be able to provide data reaching back 30-60 days beforehand, depending on the volume of logs generated per day by your network.
If your organization has a different requirement for log access, please bring this request to your Account Services Manager.
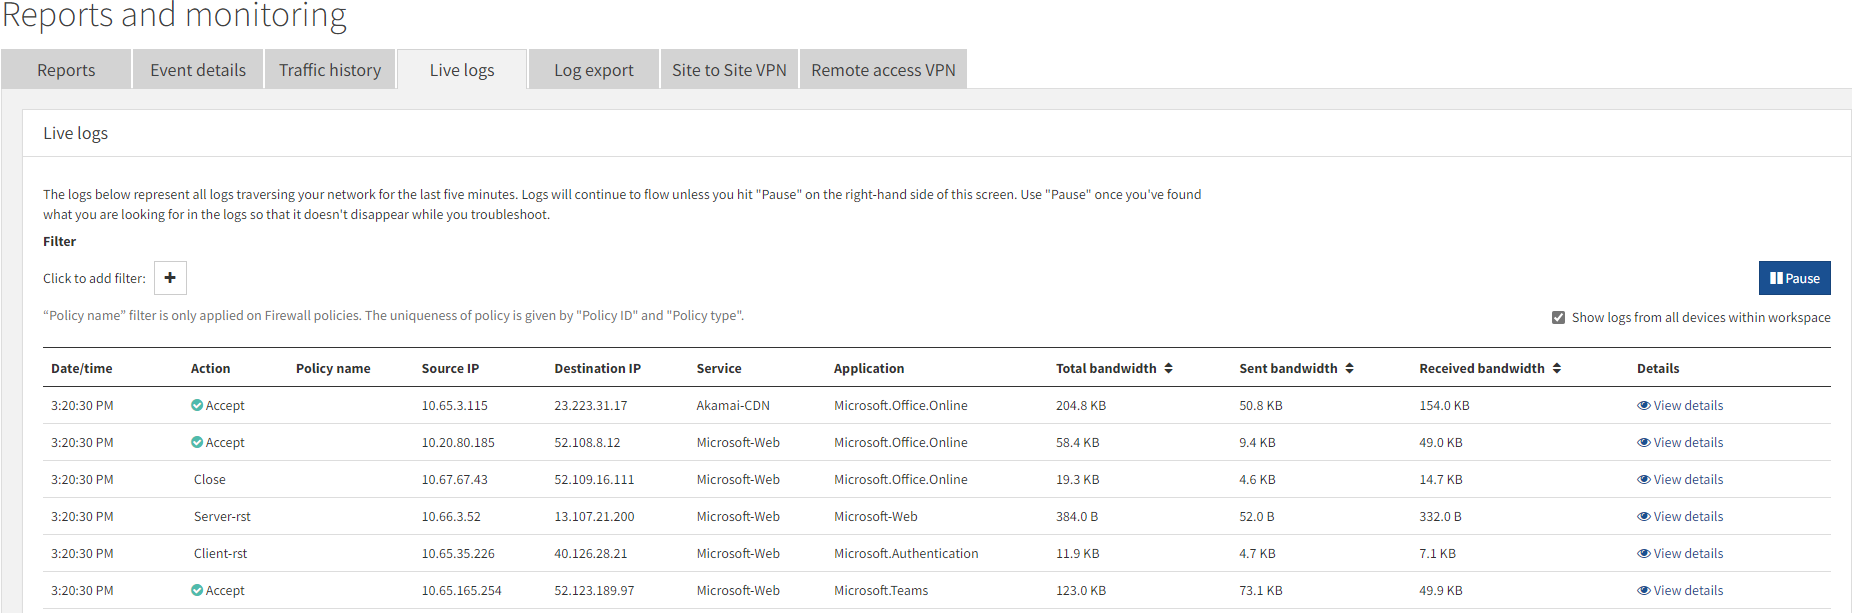
**Live logs** in the Reports & Monitoring section will be useful when you’re trying to validate a rule is filtering traffic the way you want it to, or to look for logs related to an event happening in real-time. This page is continuously updated, and you’ll see the logs moving over time. The last five minutes of all logs are listed on this page.
NoteThe **Pause** button in the top right allows you to pause the logs from flowing in so that you can investigate an event, have a conversation with team members, or work elsewhere without losing that specific information. When you hit Resume, this page will update to the current time.
### Event Details
**Events** is centralized logging, analytics, and reporting for your security appliances.
Here's a deeper look into Events:
- Allow administrators to define specific conditions or criteria. When these conditions are met, a predefined action can be executed automatically.
- The events can be anything from security threats, user activities, system status, or other specific occurrences logged by the firewall.
- The firewall can send notifications - Define conditions based on various parameters like log type, threat level, source, destination, and more.
Use Cases:
- Detecting and alerting about potential security threats in real-time.
- Automating responses to specific events
- Ensuring compliance by alerting administrators when certain activities occur that might violate company policies or regulations.
Enhanced Visibility: By using Events, you can have more proactive oversight of their network environments. Instead of manually combing through logs, the system can actively highlight and act upon concerns based on predefined rules.
Event Details are found in the reporting and monitoring drop-down menu. Event Details are real-time monitoring of triggered events. Default event triggers for events have been created, such as Botnet Communication, IPS Attack Pass Through, and Virus Pass Through Antivirus.
Event Details are not stored long term. This screen is only intended to show up to the last 7 days.
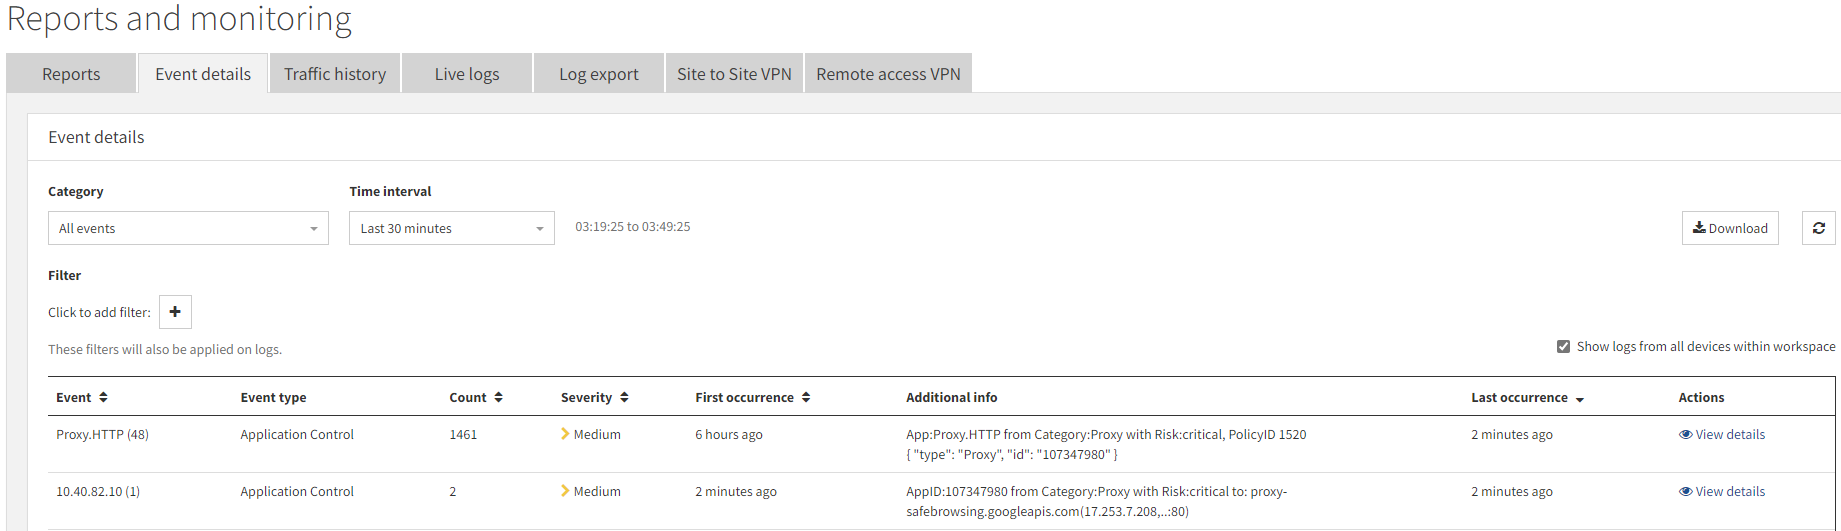
On the event details screen, you can filter by category, time interval or create a filter.
Colum descriptions:
- **Event** – The name of the trigger
- **Event Types** – The type of event
- **Count** – How many times, within the selected period, has this event occurred.
- **Severity** – The severity of the event triggered.
- **First Occurrence** – The date or time of the first trigger
- **Additional info** – additional info, such as the policy name or category of the event
- **Last occurrence** – The date or time of the last occurrence
- **Actions** - When you click **view details**, list all triggered occurrences within that event.
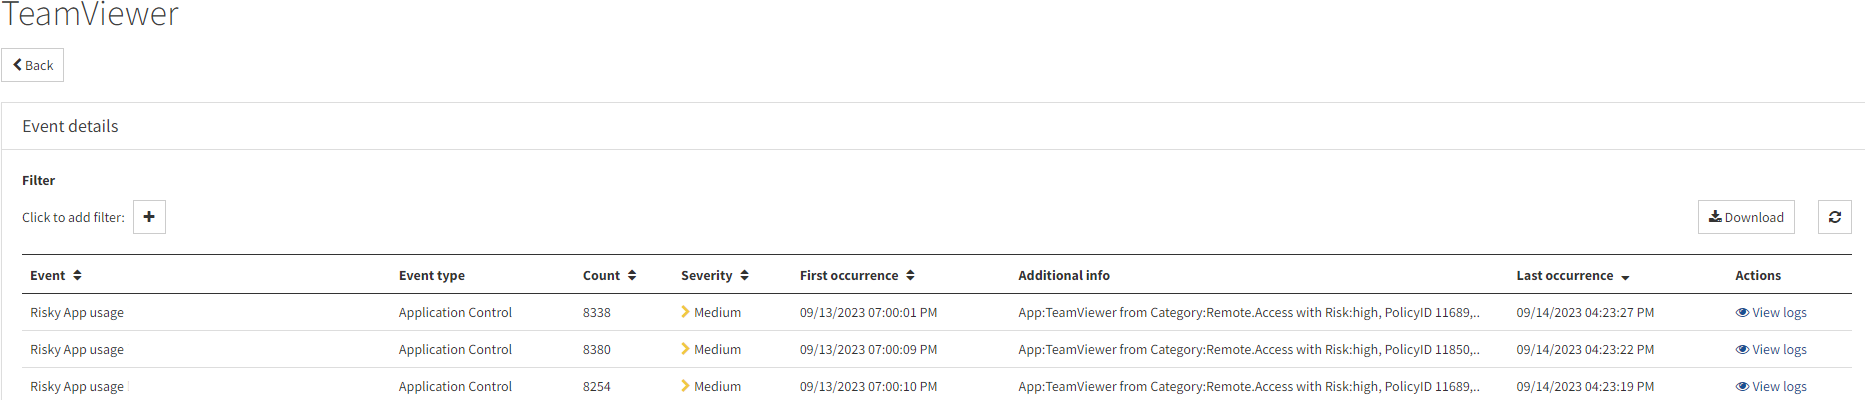
**View Details**
Viewing the event details displays all occurrences of the selected event; from here you can view logs for each event, see the policy that triggered the event.
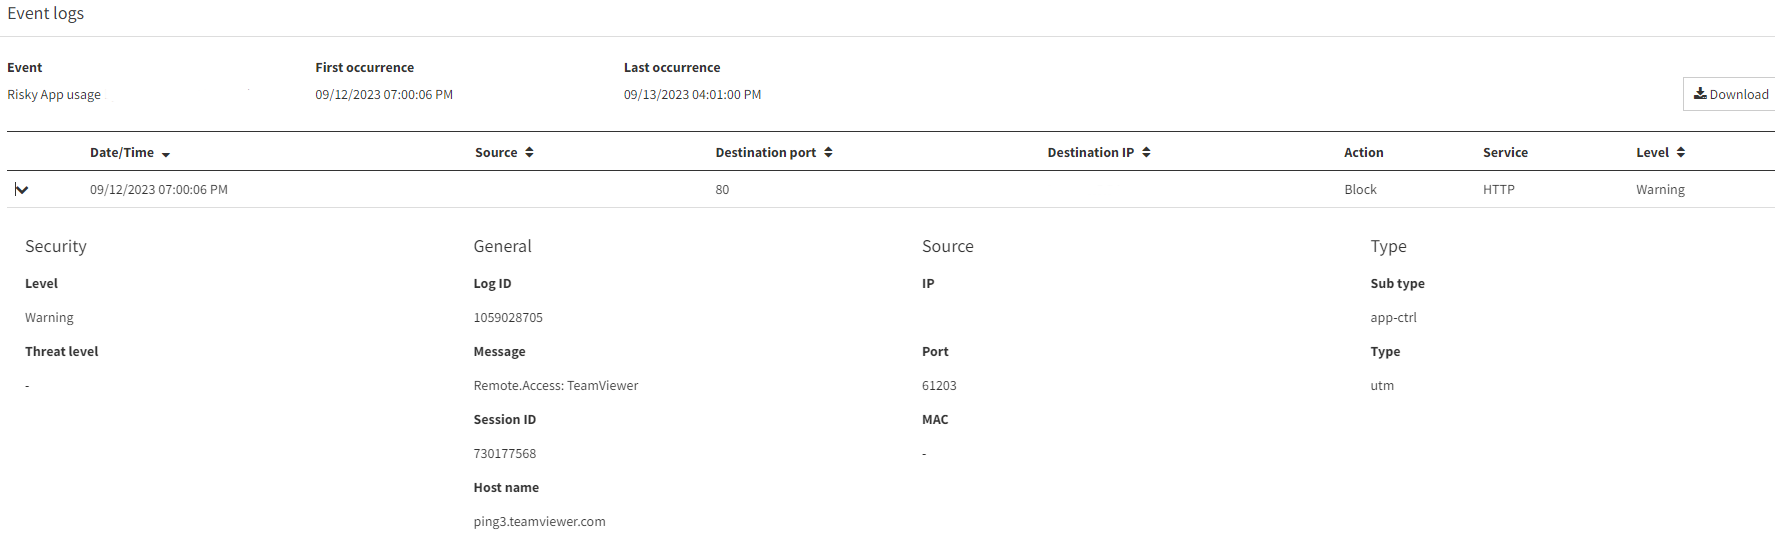
**View Event Logs**
This granular level of logging shows the source and destination information for the selected event. Please not that they MAC address will not always be shown, as certain types of events mask the MAC address.
### 
### **Site-Based Firewall**
A unique portal view is available to Site-Based Firewall customers. This type of firewall is designed to protect all the devices and systems operating within a specific physical location or site. It acts as the main point of defense between the internal network of the site and any external networks, such as the Internet. The site-based firewall (SBFW) is typically located at the perimeter of a business or organization's network. This means it's situated between the LAN (comprising all the devices, servers, and systems at the site) and the wider Internet or any other external networks.
If a customer is partnered with ENA by Zayo for management of both Core Firewall and Site-Based Firewall managed services, they will have a portal view for each, as the two use cases drive different data visualizations and management requirements.
The site-based firewall functionality differs from the application layer firewall offering.
- Due to the complex nature of SBFW and its multi-site functionality, there is no singular dashboard.
- Site-Based Firewall policies (also known as Firewall rules) are global; all changes are applied to all site-level Firewalls.
####
### Custom Report Requests
If you need data reaching further back than currently available in your portal, please contact [CTAC](https://www.ena.com/contact-us/customer-support/). The firewall does not store data indefinitely but will consider each request and may be able to provide additional log data depending on storage processes.
If you would like different reporting, dashboards, or information to be presented in the reports you are running, please contact [CTAC](https://www.ena.com/contact-us/customer-support/).
## Certificates
### Why Are Certificates Important?
ENA by Zayo's ability to provide robust cybersecurity services, including Intrusion Prevention (IPS), application layer control, and antivirus and malware protection, depends on the ability to inspect all traffic crossing your network. Today, over 70% of Internet traffic is HTTPS or encrypted. Without an SSL Certificate to inspect that encrypted traffic, this would go unmonitored by those advanced firewall security features available as part of your Managed Firewall Service. Therefore, while the firewall can continue to work without installing the certificate on your user devices, these features will be severely degraded.
### What is a Certificate Authority (CA) Certificate?
A certificate authority (CA) is a trusted entity that issues the SSL digital certificates that web browsers use to authenticate content sent from web servers.
A certificate is a small text file that is part of a third-party generated public key infrastructure (PKI). A certificate is used to cryptographically link an entity with a public key to help guarantee the identity of both the user logging in and the website they are logging into.
A certificate includes identifying information such as the company and location information for the website, as well as the third-party company name, the expiration date of the certificate, and the public key.
The firewall service uses X.509 certificates to authenticate single sign-on (SSO) for users. The X.509 standard has been in use since before 2000, and allows only a trusted authority to sign the certificate.
### Install Certificate on My User Devices
#### Importing a CA Certificate
1. Select **CA certificates** from **Certificates** drop-down.
2. Click **Import certificate**.
3. Enter a certificate **Name**.
4. **Upload certificate file** or **Paste the certificate text**.
5. Click **Create**.
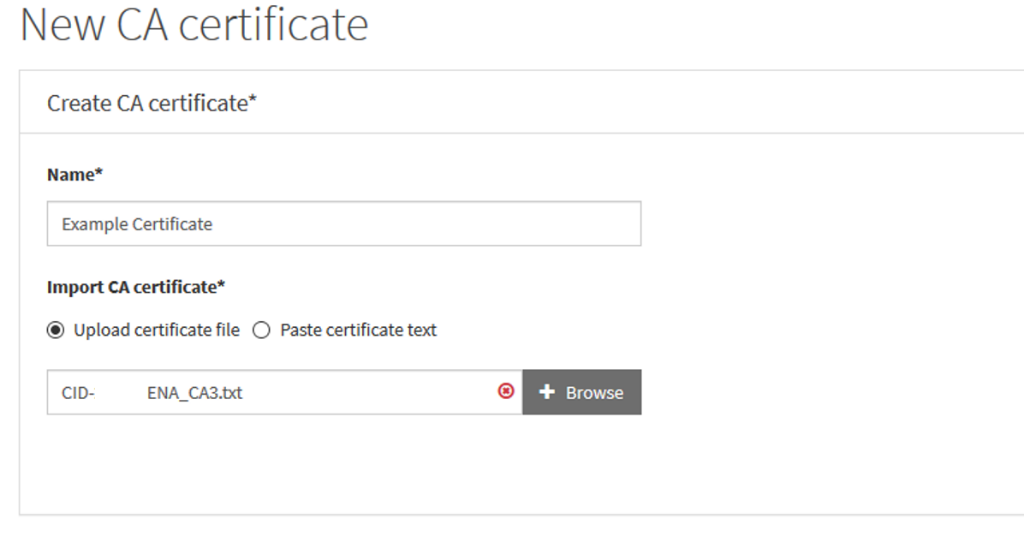
While we provide the SSL certificate, we are not able to install it directly on your machines. To do this, take advantage of an MDM or other automated process wherever possible. General guidelines for different deployment environments are below.
Links to download certificates are included in the steps below. You may also download certificates [here](/v1/docs/ena-ssl-certificates).
NoteThe instructions below are generic. The specific steps to install a certificate in your environment may vary from what is shown. Guidance is provided “as is” and cannot be directly supported beyond the outline below.
#### Install via Group Policy
1. Download ca.cert.crt.[ca.cert.crt](https://cdn.us.document360.io/ed04ecbf-0868-4e77-a11e-6df8b843143d/Images/Documentation/ca.cert.crt?sv=2026-02-06&spr=https&st=2026-11-12T13%3A05%3A22Z&se=2026-11-12T14%3A05%3A22Z&sr=c&sp=r&sig=IRMSvNqjFWbxSho%2FmeQifMS1CVGBoOJhoxOh9hRBN%2Fc%3D)
1. Open **Administrative Tools**, and then click **Group Policy Management**.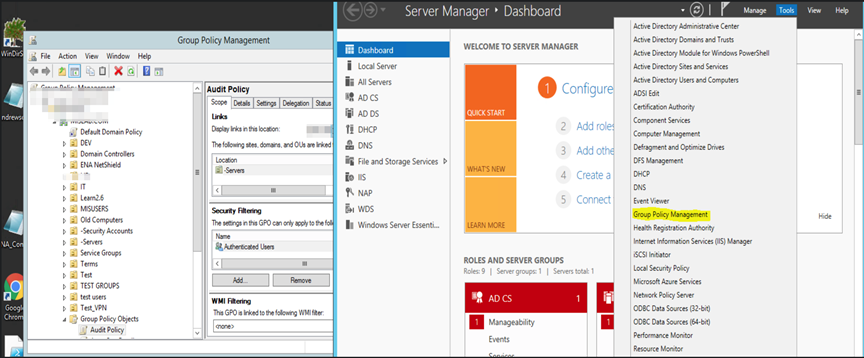
2. In the console tree, under the top level of the domain, right-click, create a new policy, and name it clearly. In the example steps below, we name it **ENA** **NetShield UTM** **Certificate**.NoteEnvironments vary. Your setup may not be exactly as depicted here. For example, you may have other top-level GPO on which you want to base this GPO. Please proceed carefully.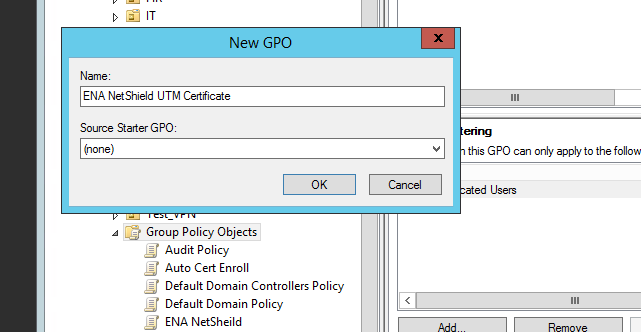
3. Double-click **Group Policy Objects** in the domain containing the ENA NetShield UTM Certificate Group Policy object (GPO) that you want to edit. Right-click and select **Edit**.
4. In the Group Policy Management Console (GPMC), go to **Computer Configuration > Windows Settings > Security Settings > Public Key Policies**.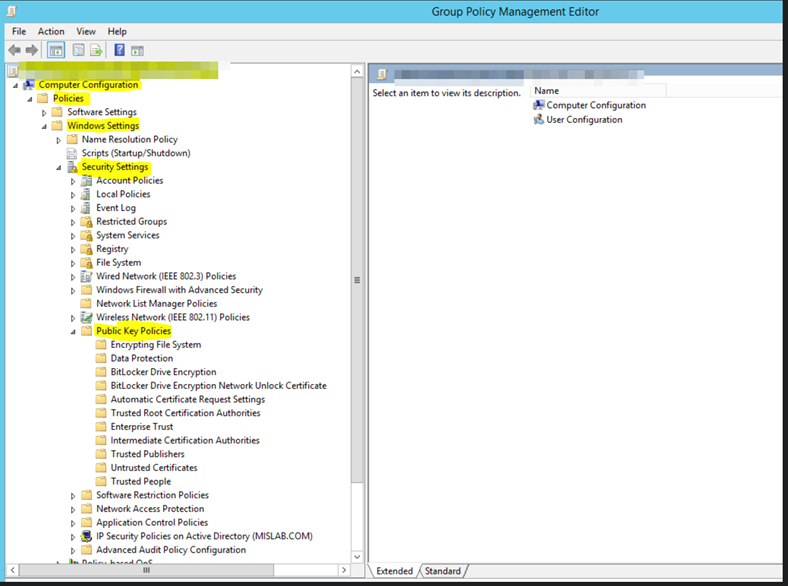
5. Right-click the **Trusted Root Certification Authorities** store. Click **Import**.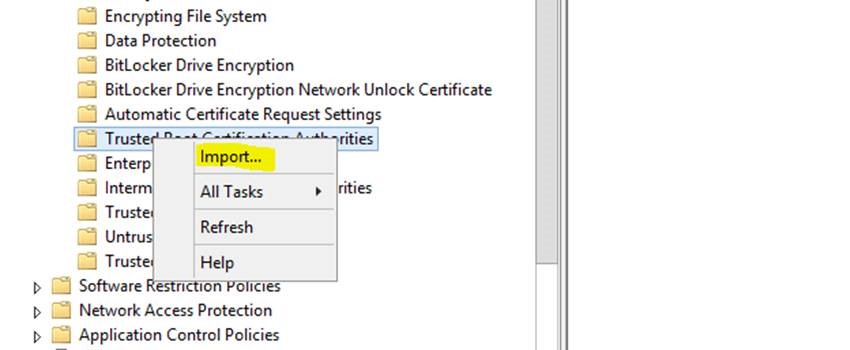
6. Follow the steps in the Certificate Import wizard to import the downloaded certificate.
7. During install, select the **Local Machine** store location option.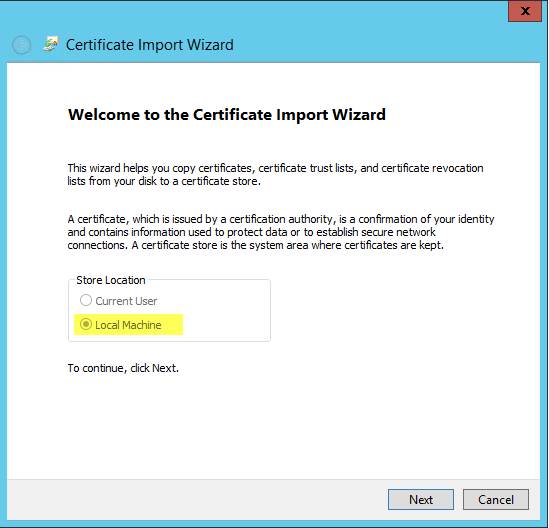
#### Install via Google Admin (Chrome)
NoteThe instructions below are generic. The specific steps to install a certificate in your environment may vary from what is shown. Guidance is provided “as is” and cannot be directly supported by ENA by Zayo beyond the outline below.
1. Download ca.cert.crt.[ca.cert.crt](https://cdn.us.document360.io/ed04ecbf-0868-4e77-a11e-6df8b843143d/Images/Documentation/ca.cert.crt?sv=2026-02-06&spr=https&st=2026-11-12T13%3A05%3A22Z&se=2026-11-12T14%3A05%3A22Z&sr=c&sp=r&sig=IRMSvNqjFWbxSho%2FmeQifMS1CVGBoOJhoxOh9hRBN%2Fc%3D)
2. Login to your Google Admin Account. Click the hamburger menu in the upper left corner to see the Google Admin Menu.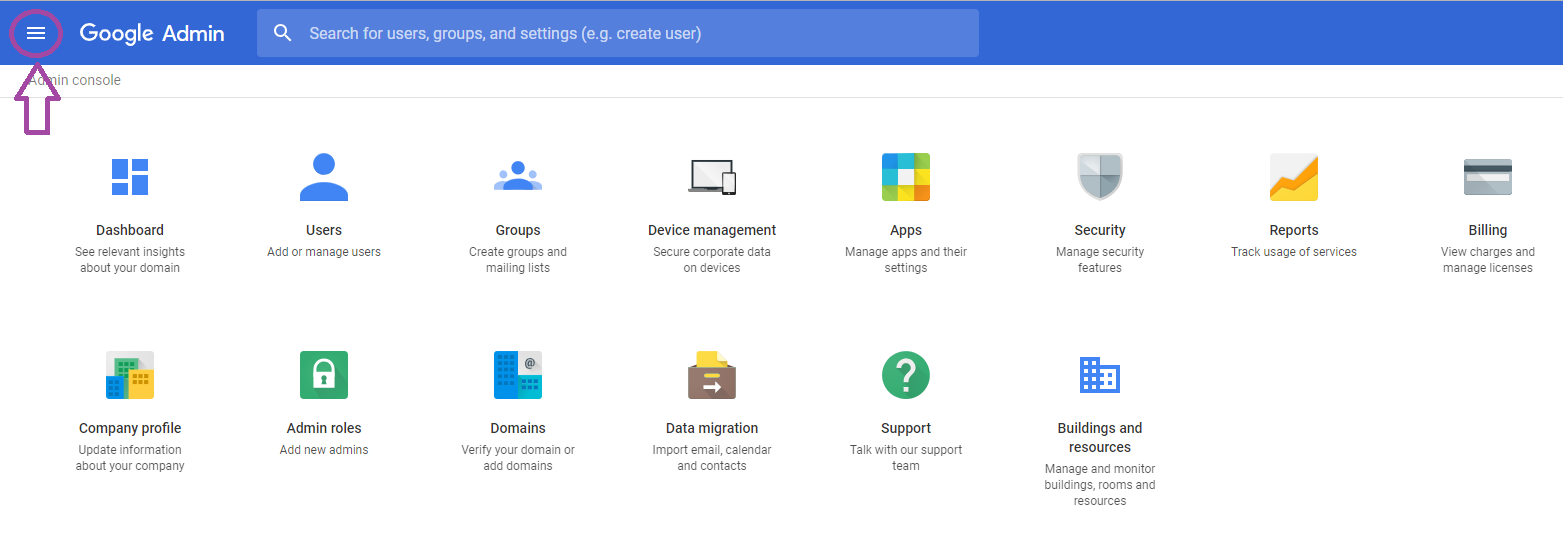
3. Click **Devices** in the Admin menu. In the pop-up menu, click **Networks**.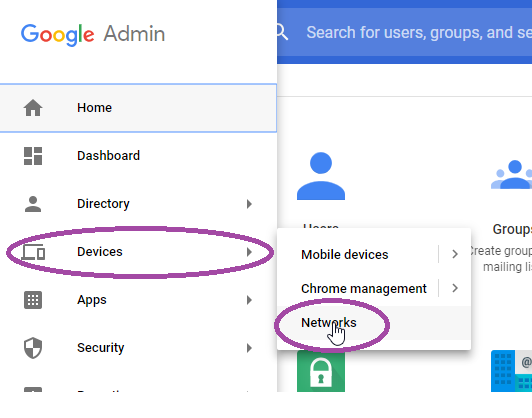
4. Click **Certificates**.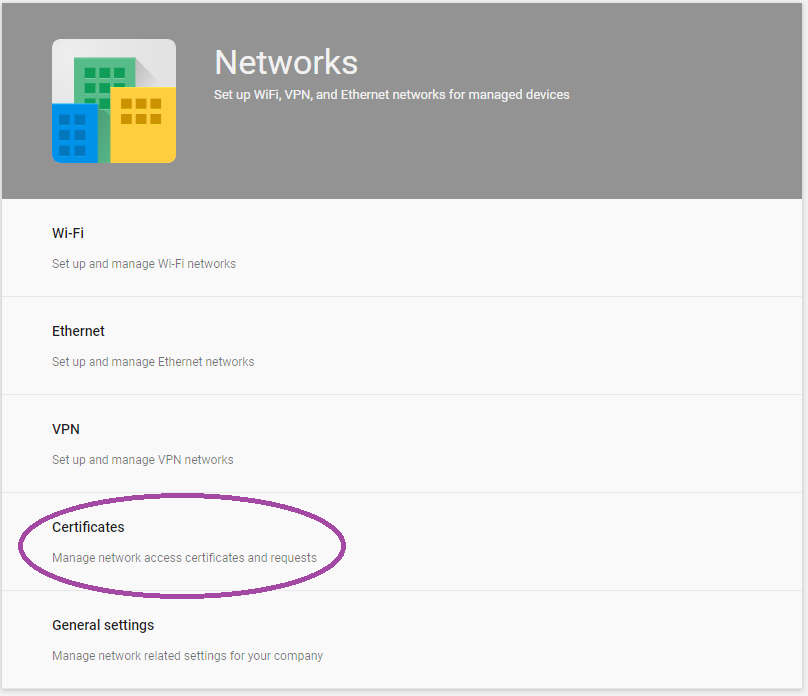
5. Select the organization to which you would like to deploy the certificate. Click **Add Certificate**.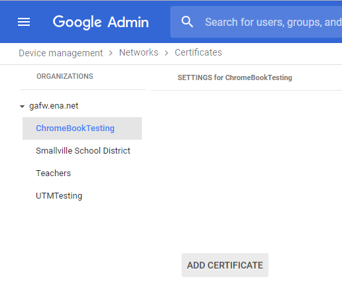
6. Browse to and open the **ca.cert.crt** root certificate downloaded in step 1.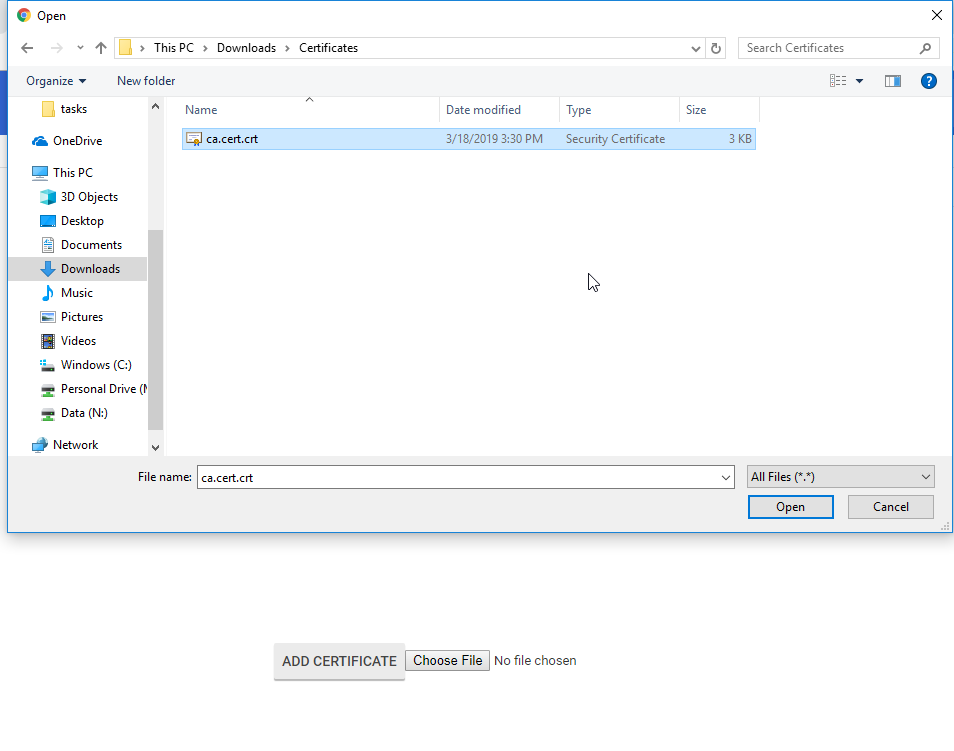
7. Click the checkbox to **Use this certificate as an HTTPS certificate authority**.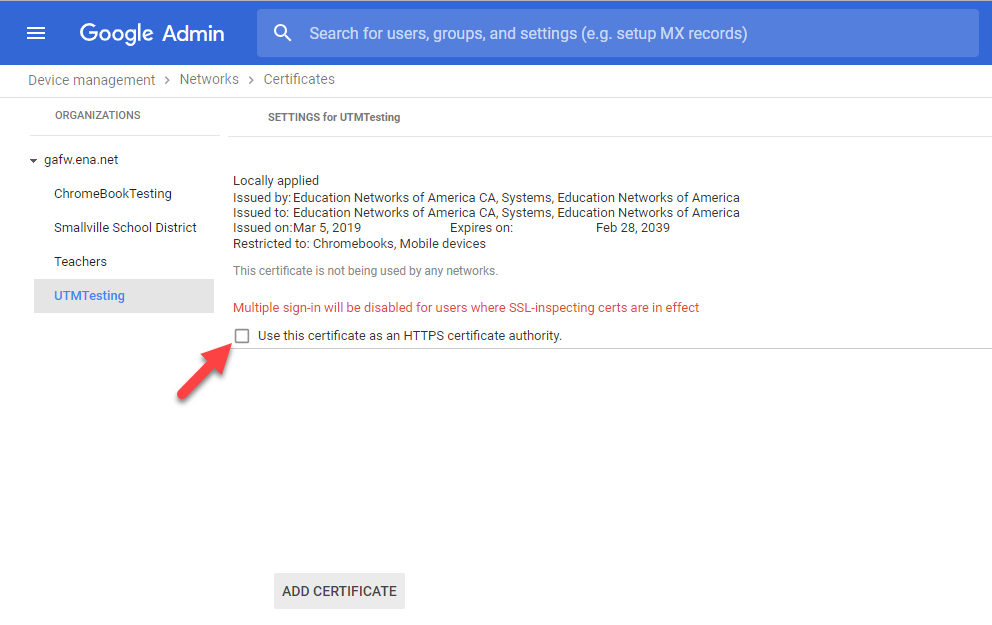
8. Click **Save**.
Once you have saved the changes to the certificate, you will see **Certificate is marked as an HTTPS certificate authority**, and it will begin being deployed to Chromebooks in the organization you selected at the beginning of this process.
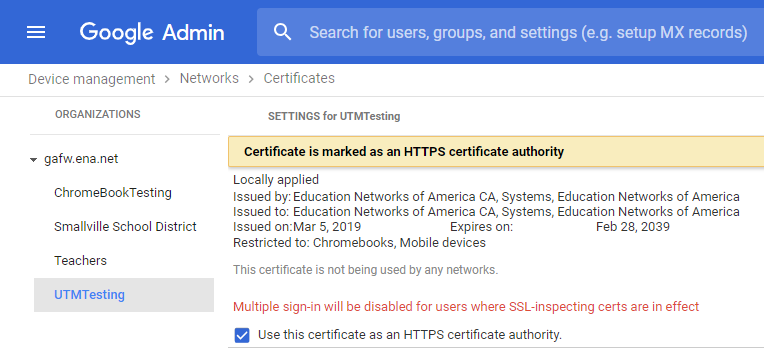
**Confirm Installation**
1. Type `chrome://settings` in a Chrome browser address bar.
2. Type **Manage Certificate** in the search bar.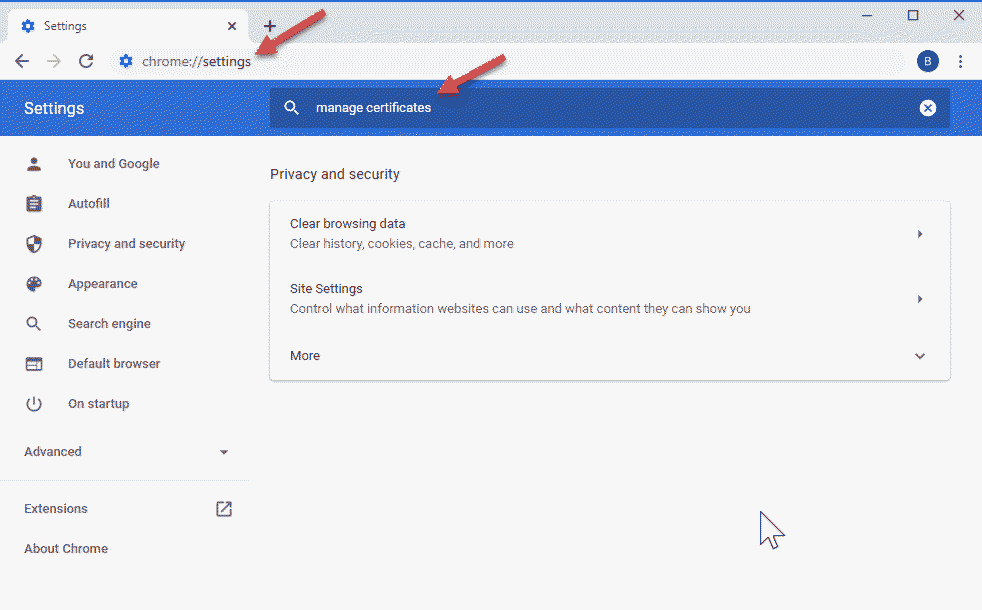
3. Click on the **Manage Certificates** link.
4. Click on the **Authorities** tab.
You should see a certificate in the list issued to **org-Education Networks of America**. The icon on the right indicates it was deployed from Google Admin. If you manually deployed the certificate to this Chromebook, you will not see the icon.
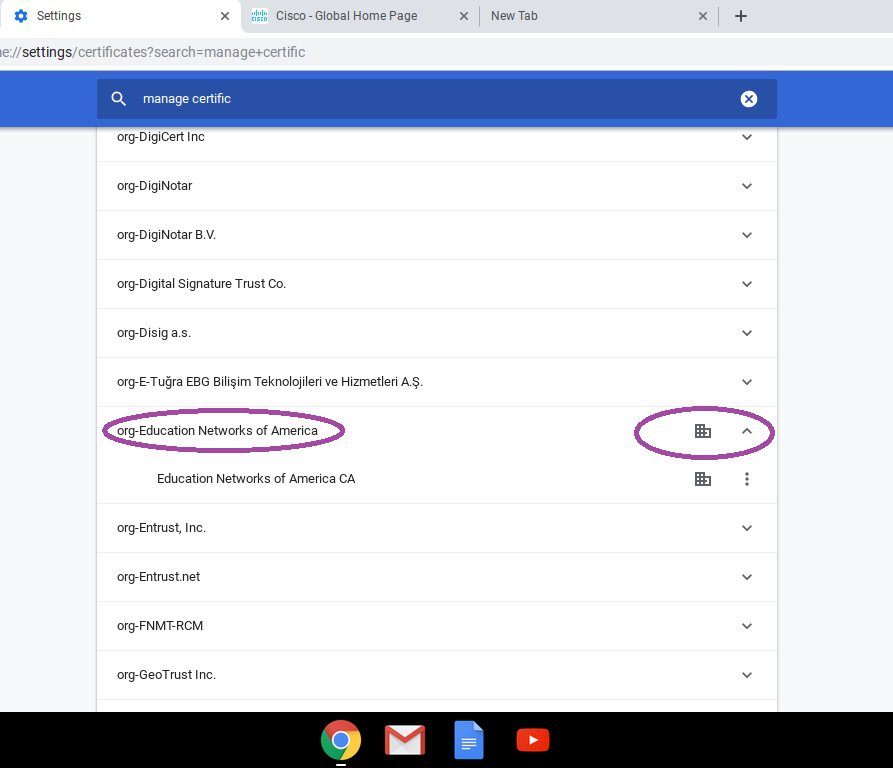
NoteA separate certificate and decryption process is used for [Intrusion Prevention (IPS) policies](/docs/managed-firewall#intrusion-prevention-ips).
#### Install on Clients Running Windows OS
If you have an Active Directory Group Policy for Windows client devices, you may use a group policy object to install the ENA by Zayo SSL certificate on all Windows devices.
If you are not using an Active Directory Group Policy for Windows, you first install the certificate in the Trusted Root Certification Authorities store on each client. Certificates installed in the Trusted Root Certification Authorities store are accessed by Internet Explorer and Google Chrome browsers for Windows.
If Mozilla Firefox will be used on that machine, you will also need to install the certificate directly in the [Mozilla Firefox browser](https://portal.document360.io/#install-in).
If you would like to leverage Group Policy for Windows devices using Firefox, manual configuration is required and general information is provided below.
NoteThe instructions below are generic. Te specific steps to install a certificate in your environment may vary from what is shown. Guidance is provided “as is” and cannot be directly supported by ENA beyond the outline below.
**Install in Trusted Root Certification Authorities Store for Clients Running Windows OS**
1. Download ca.cert.der.[ca.cert.der](https://cdn.us.document360.io/ed04ecbf-0868-4e77-a11e-6df8b843143d/Images/Documentation/ca.cert.der?sv=2026-02-06&spr=https&st=2026-11-12T13%3A05%3A22Z&se=2026-11-12T14%3A05%3A22Z&sr=c&sp=r&sig=IRMSvNqjFWbxSho%2FmeQifMS1CVGBoOJhoxOh9hRBN%2Fc%3D)
2. Open the **Network and Internet** ara of the Windows Control Panel.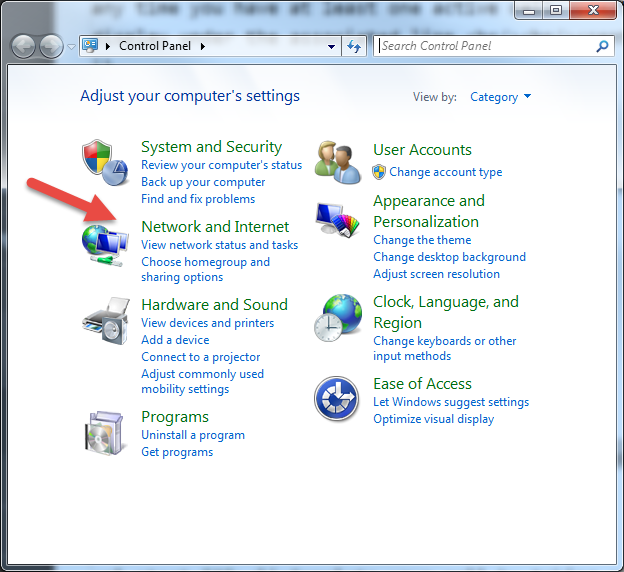
3. Select **Internet Options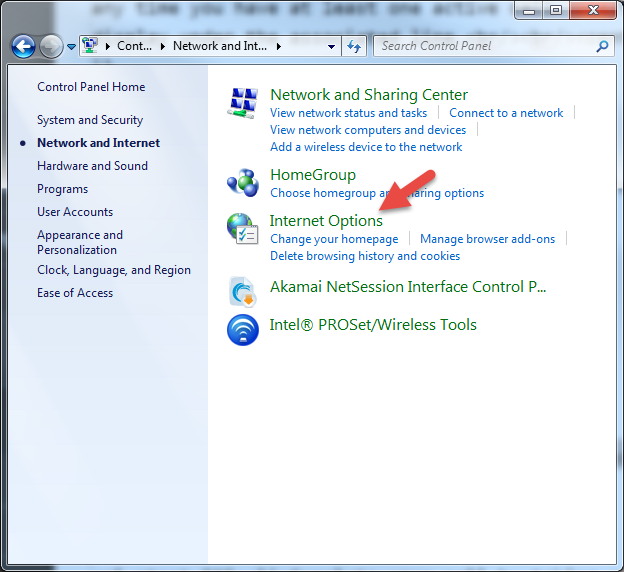**
4. Click the **Content** tab, then click **Certificates**.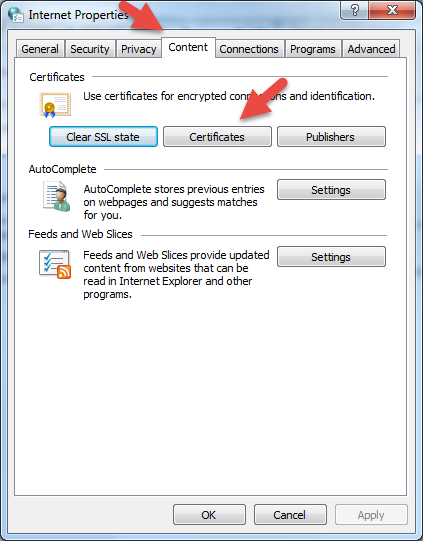
5. Click **Import** to open the Certificate Import Wizard. Click **Next**.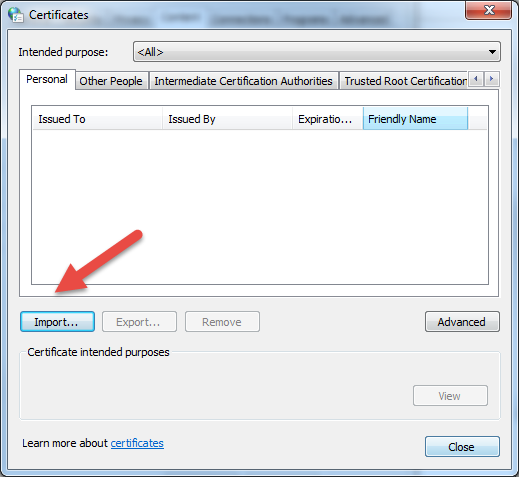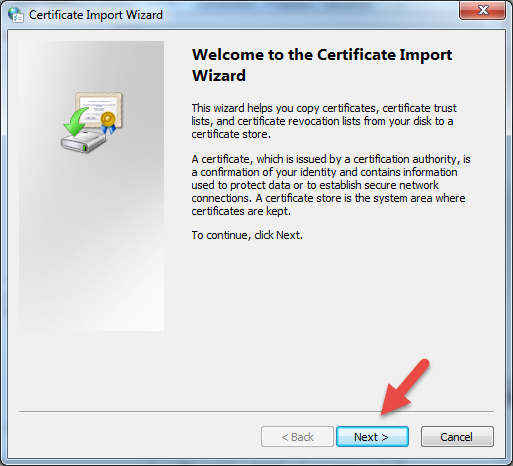
6. Click **Browse**. Locate the file downloaded in step 1. (You may need to select All Files from the drop-down menu to see the file.)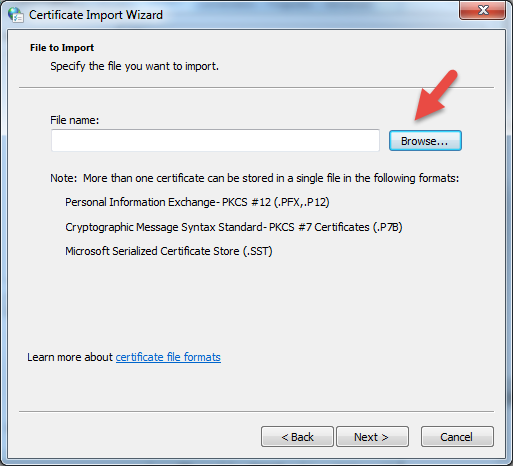
7. Click **Open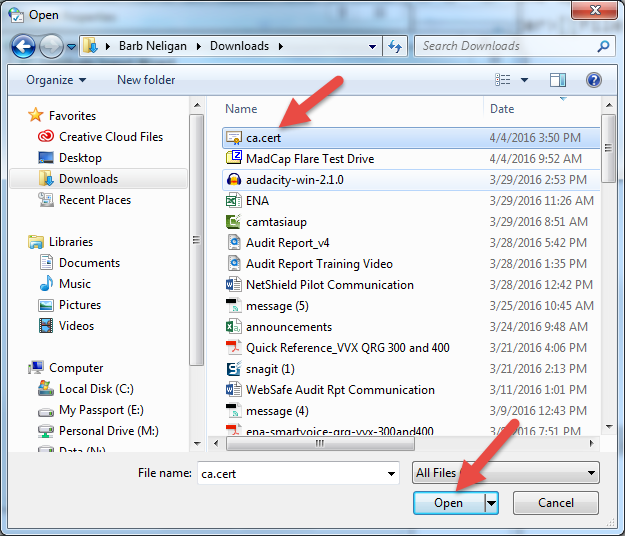**
8. Click **Next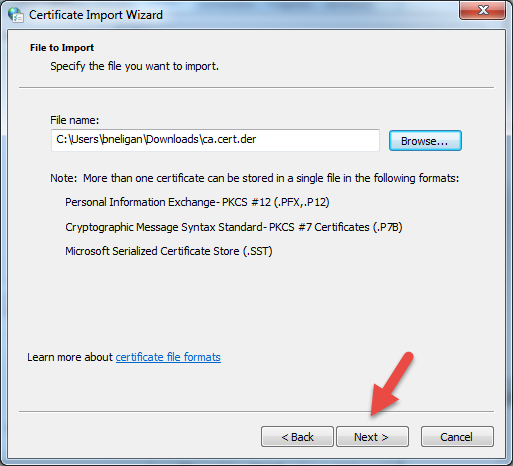**
9. Select **Place all certificates in the following store**, then click **Browse**.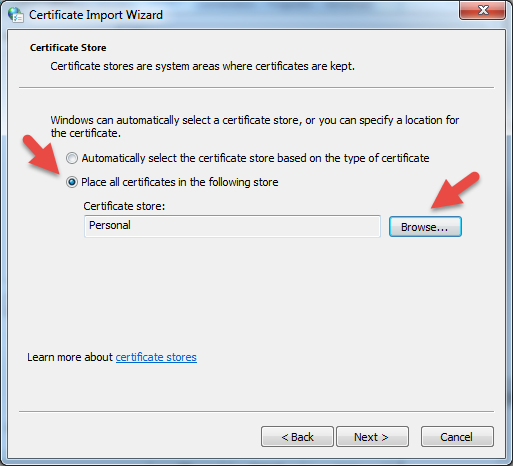
10. Select **Trusted Root Certificate Authorities**, then click **OK**.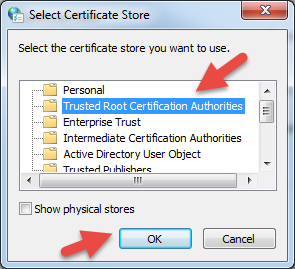
11. Click **Next**.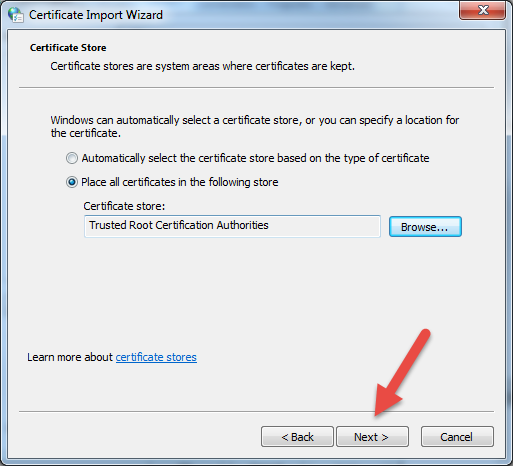
12. Click **Finish**.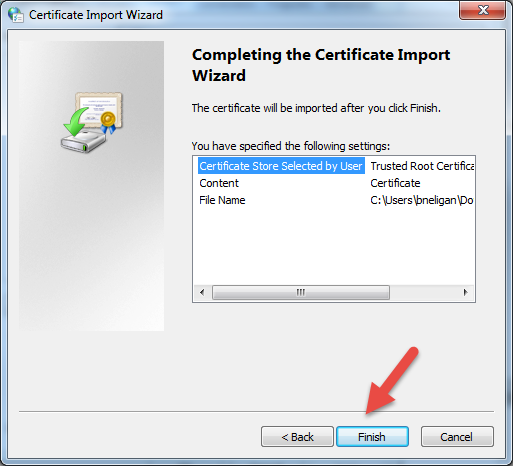
13. When success message displays, click **OK**.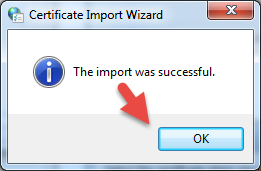
**Install in Mozilla Firefox for Windows**
Deploying Root CAs for Firefox users can be difficult because there is no built-in way to centrally manage this process in Firefox. There are a few ways to configure Firefox to trust certificates in the Windows certificate store, making management via group policy much easier in the long run.
NoteThe instructions below are generic. The specific steps to install a certificate in your environment may vary from what is shown. Guidance is provided “as is” and cannot be directly supported by ENA by Zayo beyond the outline below.
As of Firefox 49 (FF49), an option has been included to allow Firefox to trust Root authorities in the Windows certificate store. This means that certificates can be deployed via group policy and Firefox will trust the same Root authorities that Internet Explorer trusts. For more details click here: [https://bugzilla.mozilla.org/show_bug.cgi?id=1265113](https://bugzilla.mozilla.org/show_bug.cgi?id=1265113)
This feature is not turned on by default, and additional configuration is required before use. For more details, click here: [https://bugzilla.mozilla.org/show_bug.cgi?id=1314010](https://bugzilla.mozilla.org/show_bug.cgi?id=1314010)
**Allow Firefox to Trust Root Authorities on a Single Device**
To enable on a single device:
- Type `about:config` in the Firefox address bar.
- If prompted, accept warnings.
- Right-click to create a new Boolean value, and enter `security.enterprise_roots.enabled` as the **name**.
- Set the value to `True`.
- At this point, the local windows certificate store is ready for you to install the certificate.
#### Install on Clients Running Mac OS
You first install the certificate in the Systems area of the Keychain Access app. Certificates installed here are accessed by Safari and Google Chrome browsers for Mac.
If Mozilla Firefox will be used on that machine, you will also need to install the certificate directly in the Mozilla Firefox browser.
**Install Using Keychain Access**
1. Download ca.cert.der.[ca.cert.der](https://cdn.us.document360.io/ed04ecbf-0868-4e77-a11e-6df8b843143d/Images/Documentation/ca.cert.der?sv=2026-02-06&spr=https&st=2026-11-12T13%3A05%3A22Z&se=2026-11-12T14%3A05%3A22Z&sr=c&sp=r&sig=IRMSvNqjFWbxSho%2FmeQifMS1CVGBoOJhoxOh9hRBN%2Fc%3D)
2. Open the Keychain Access application and select **System** and **Certificates** in the sidebar menu.
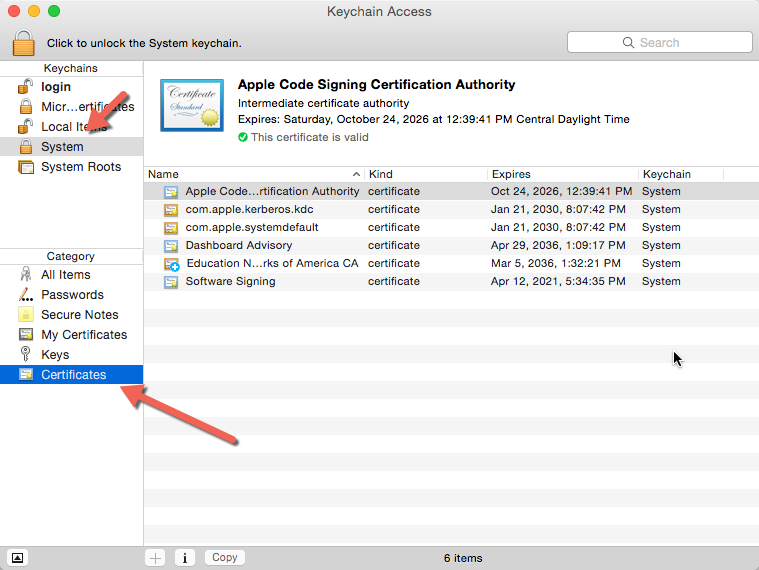
1. Drag the ENA by Zayo SSL certificate file into the Keychain Access panel.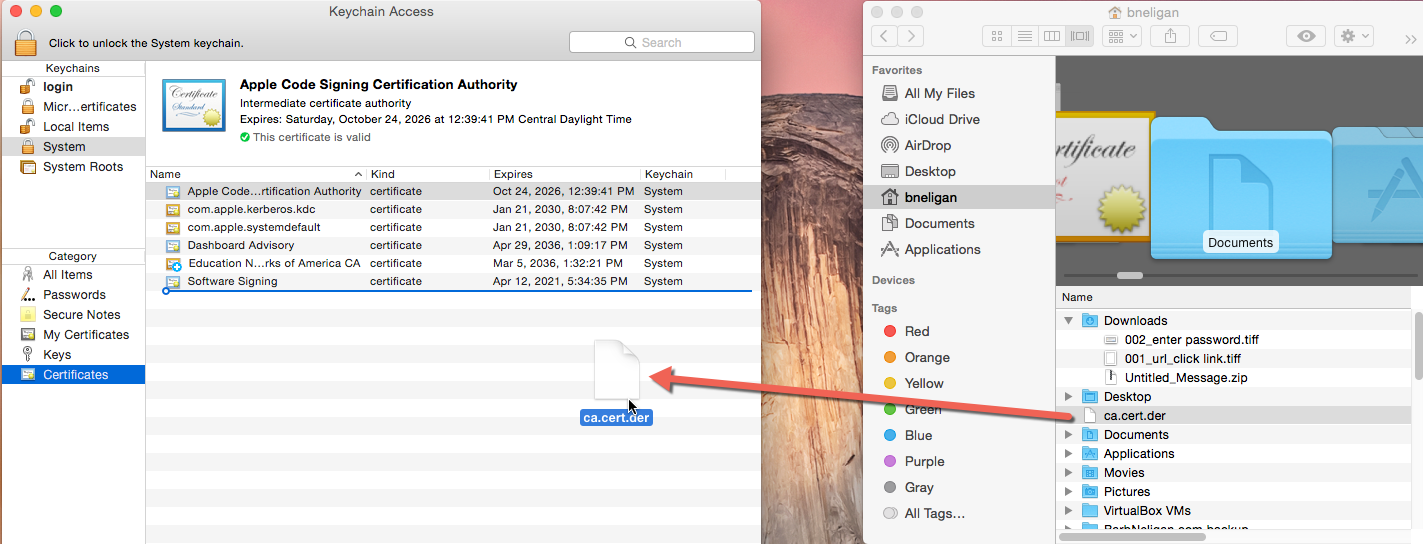
2. Enter **Password**.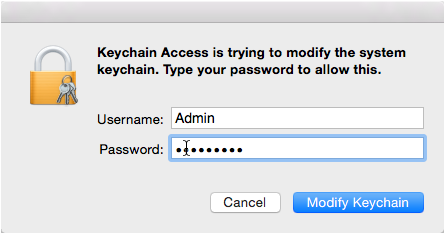
3. Click on the certificate to open it.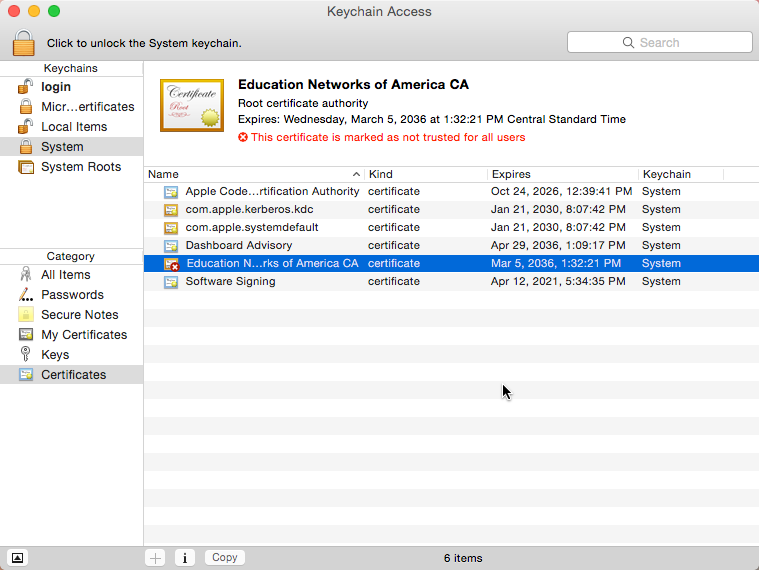
4. Select **Always Trust** in drop-down menu, and close the dialogue box.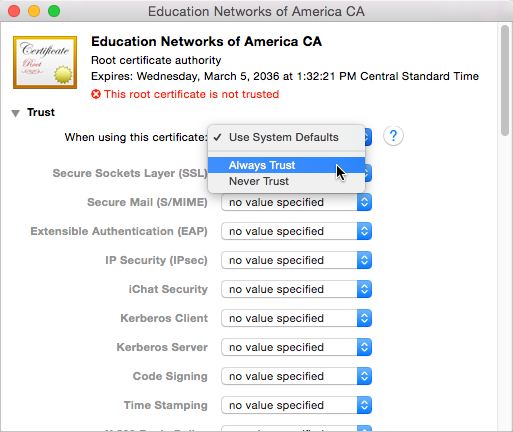
5. Enter **Password**.
6. The blue plus sign indicates the ENA by Zayo SSL certificate is now trusted.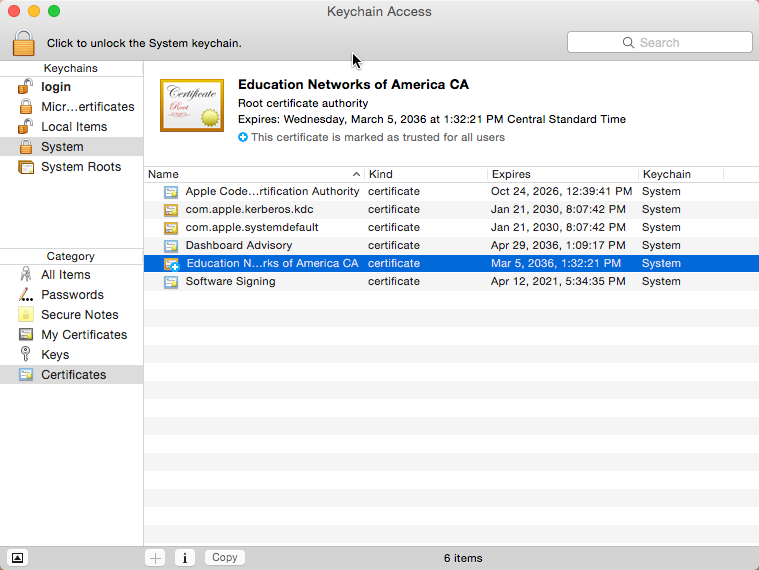
**Install from Mozilla Firefox Browser for Mac OS**
1. With this window open in a Mozilla Firefox browser, download ca.cert.der.[ca.cert.der](https://cdn.us.document360.io/ed04ecbf-0868-4e77-a11e-6df8b843143d/Images/Documentation/ca.cert.der?sv=2026-02-06&spr=https&st=2026-11-12T13%3A05%3A22Z&se=2026-11-12T14%3A05%3A22Z&sr=c&sp=r&sig=IRMSvNqjFWbxSho%2FmeQifMS1CVGBoOJhoxOh9hRBN%2Fc%3D)
2. Click the **Trust this CA to identify websites** and click **OK**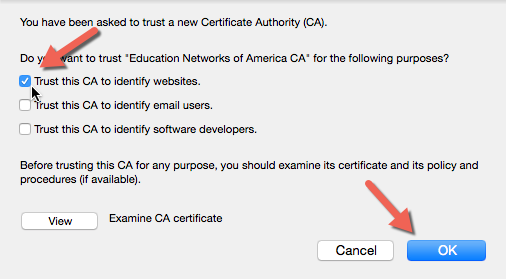
**Import Certificate Using Menu in Mozilla Firefox for Mac OS**
1. Download ca.cert.der.[ca.cert.der](https://cdn.us.document360.io/ed04ecbf-0868-4e77-a11e-6df8b843143d/Images/Documentation/ca.cert.der?sv=2026-02-06&spr=https&st=2026-11-12T13%3A05%3A22Z&se=2026-11-12T14%3A05%3A22Z&sr=c&sp=r&sig=IRMSvNqjFWbxSho%2FmeQifMS1CVGBoOJhoxOh9hRBN%2Fc%3D)
2. Open the menu and select **Preferences**.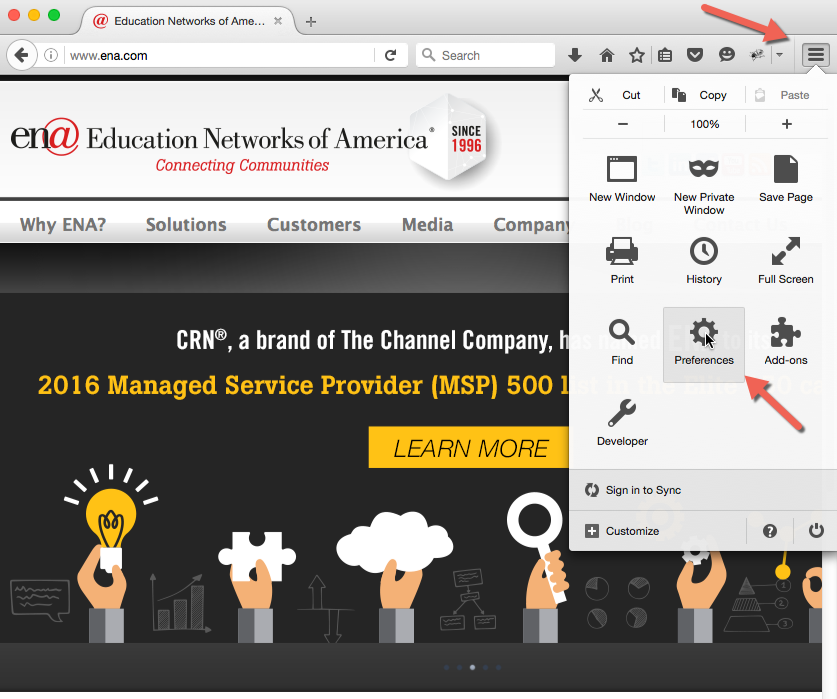
3. Click **Advanced**, open the **Certificates** tab, then click **View Certificates**.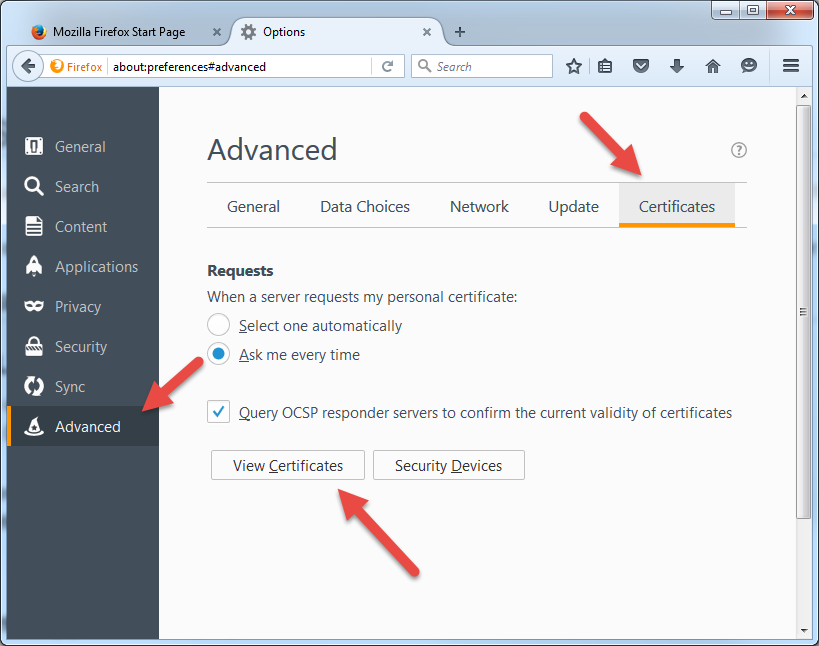
4. Click **Import**.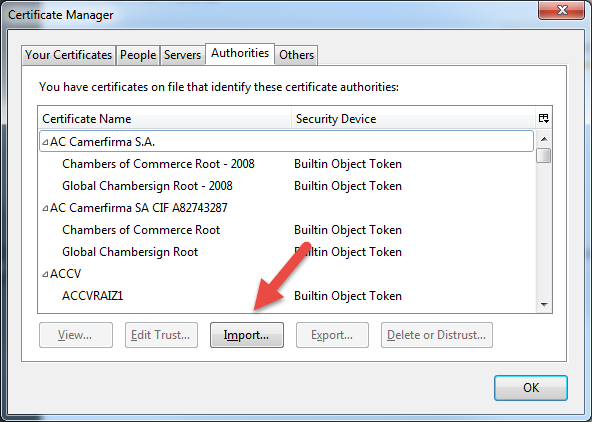
5. Browse to the file and click **Open**.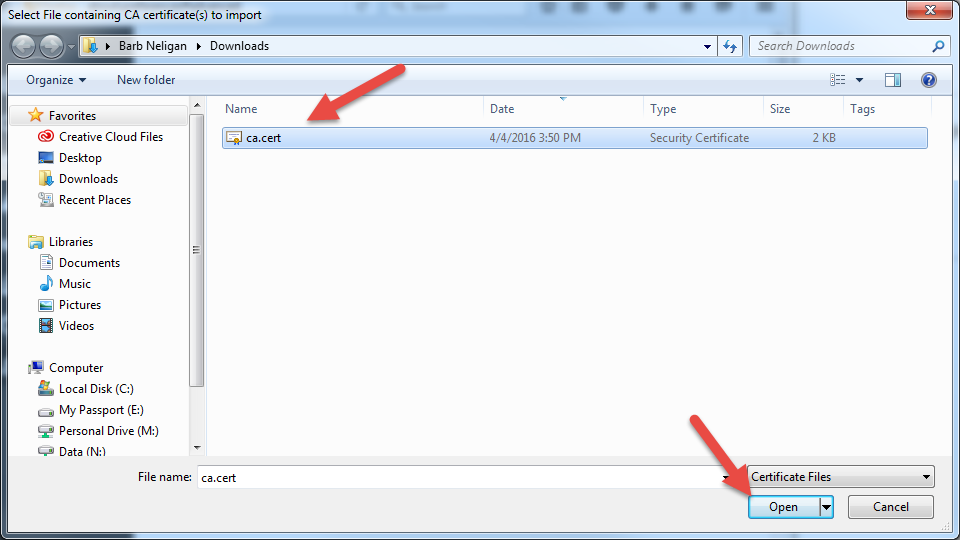
6. Select **Trust this CA to identify websites** and click **OK**.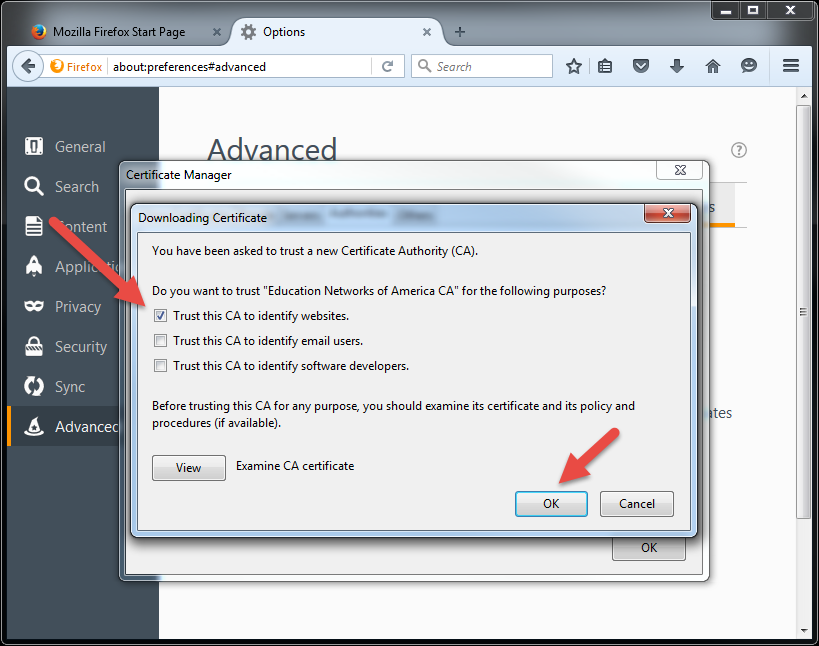
7. Click **OK** to close dialogue box.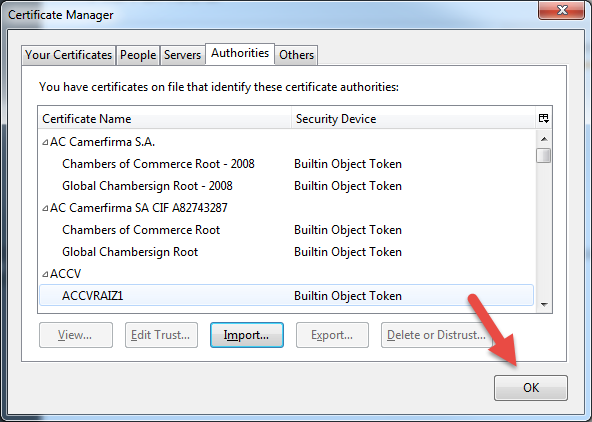
#### *Install on Apple IOS devices*
1. From a browser on your Apple iOS device, download ca.cert.der.[ca.cert.der](https://cdn.us.document360.io/ed04ecbf-0868-4e77-a11e-6df8b843143d/Images/Documentation/ca.cert.der?sv=2026-02-06&spr=https&st=2026-11-12T13%3A05%3A22Z&se=2026-11-12T14%3A05%3A22Z&sr=c&sp=r&sig=IRMSvNqjFWbxSho%2FmeQifMS1CVGBoOJhoxOh9hRBN%2Fc%3D)
2. If prompted, click **Allow**.
3. Click **Install**.
4. Enter your passcode.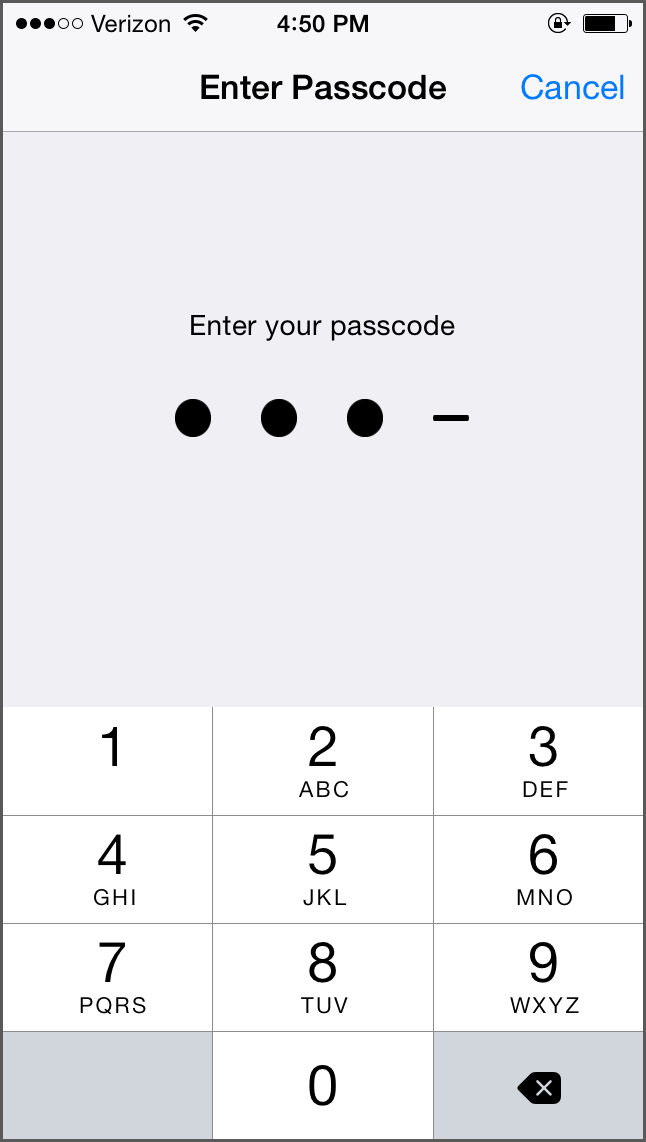
5. Click **Install**.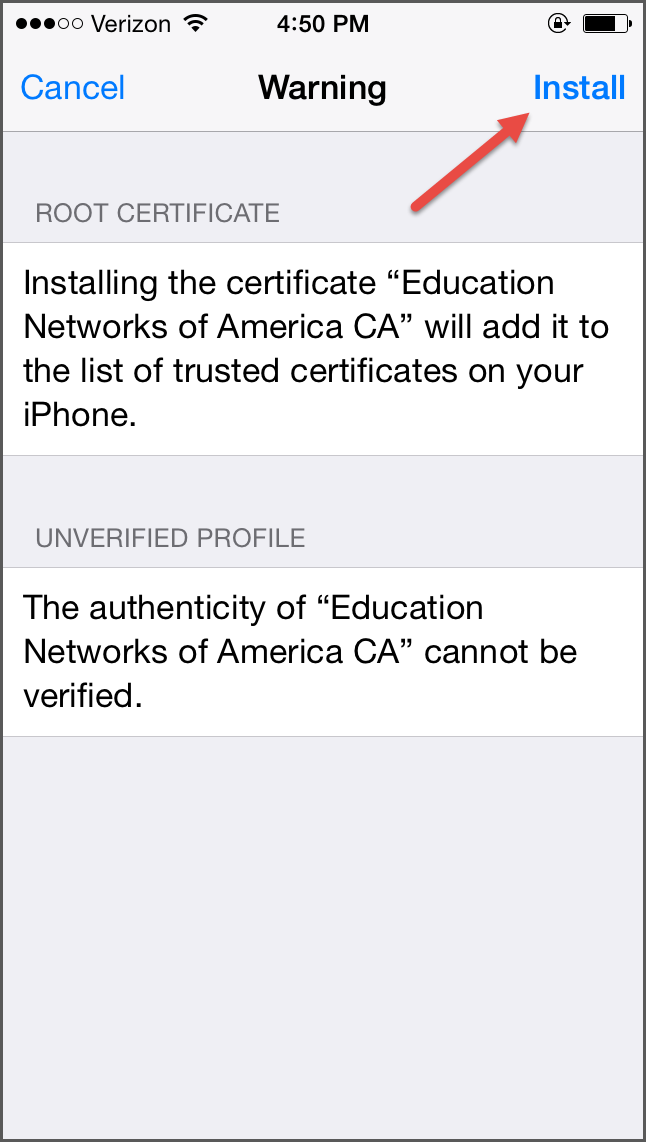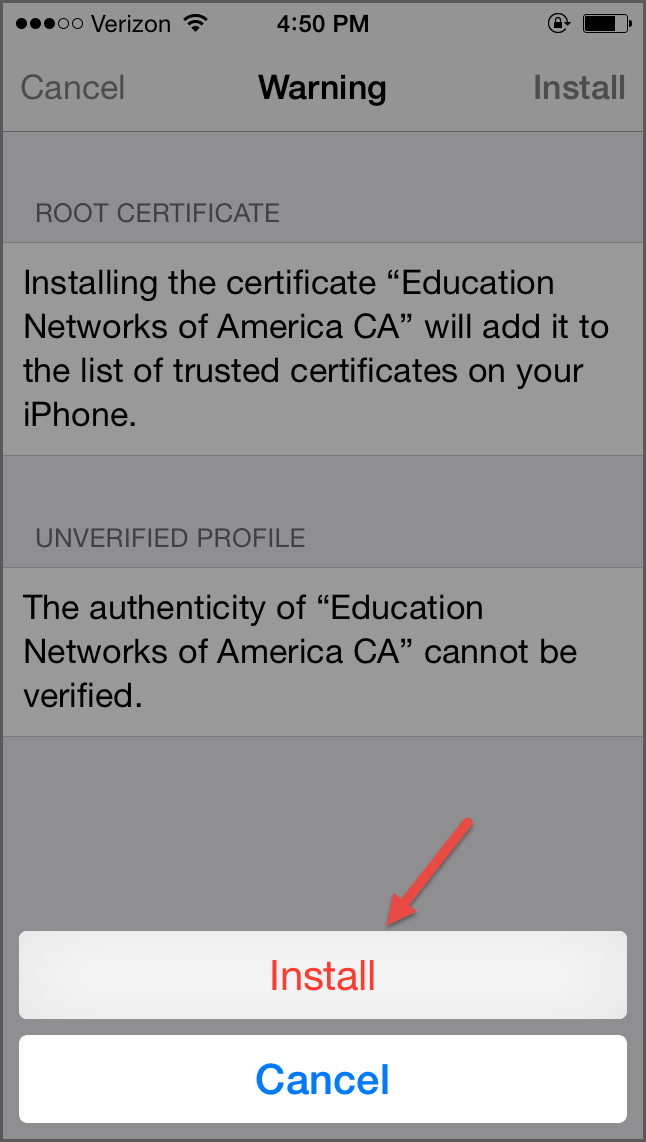
6. Click **Done**.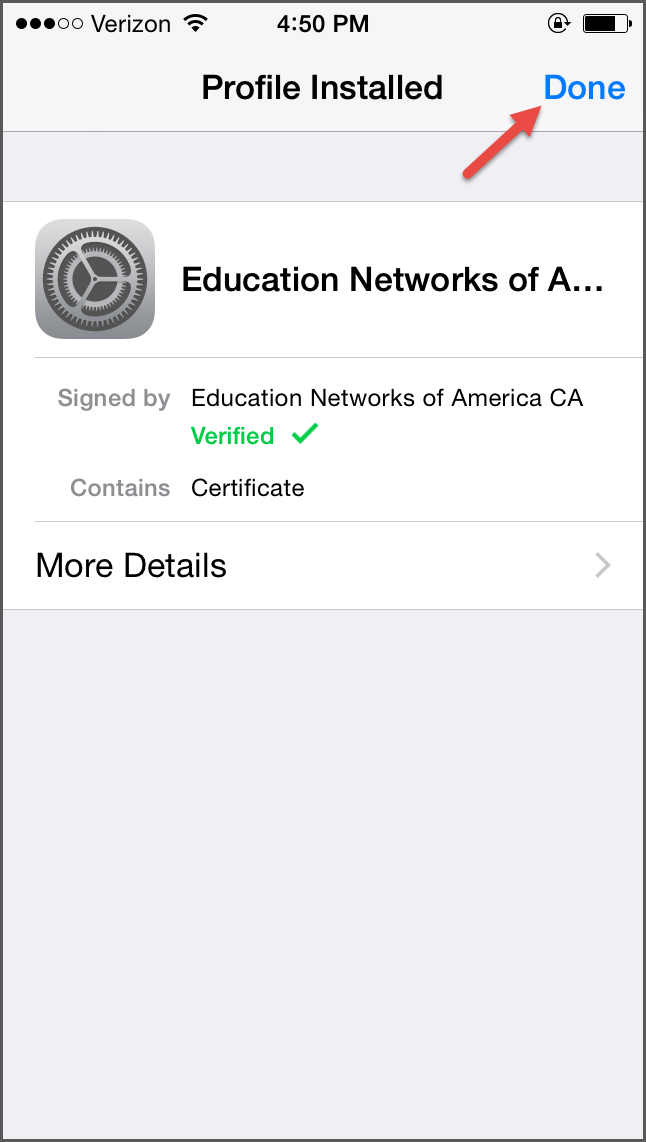
### Install ENA by Zayo's Certificate on Server
#### What Is a Server Certificate?
After a certificate is successfully installed on a server, it ensures a secure connection between the server and its client by activating the HTTPS protocol and the padlock. The certificate ensures the encryption and decryption of transmitted data. This certificate will be different from the certificate used for identity management and user device authentication. An example use case is SSL VPN.
#### Importing a Server Certificate
1. Select **Server certificates** from **Certificates** drop-down.
2. Click **Import certificate**.
3. Enter a certificate **Name**.
4. In **Description** enter name or the site or server (optional).
5. **Upload certificate file** or **Paste the certificate text**.
6. Upload or paste **Private key**.
7. Click **Create**.
### Mapped Server Certificates
#### *Importing a Mapped Server Certificate*
1. Select **Mapped server certificates** from **Certificates** drop-down.
2. Click **New mapped server certificate**.
3. Enter a certificate **Name**.
4. In **Description** enter name or the site or server (optional).
5. **Select devices and certificates to map**.
6. Click **Create**.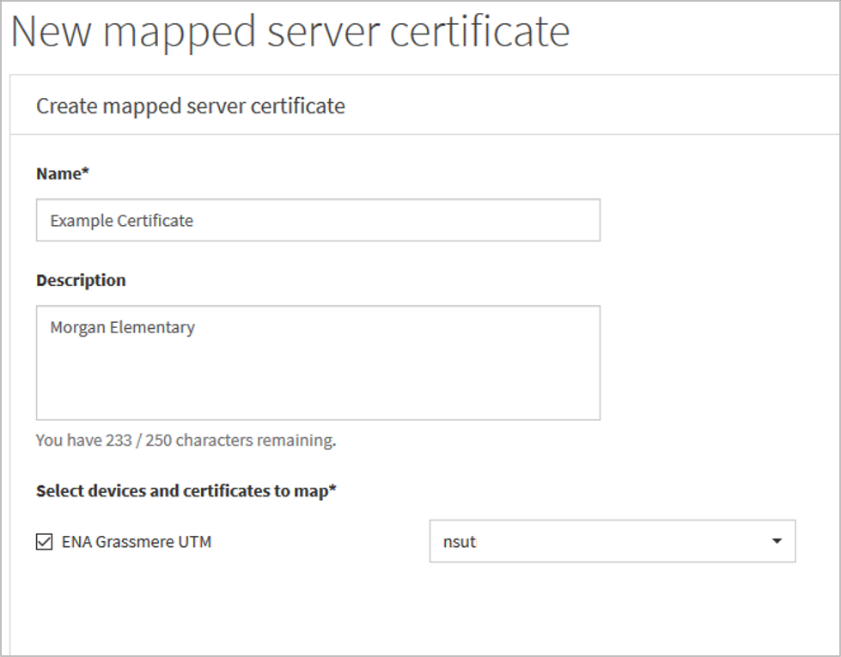
## Firewall Objects
NoteObjects are not policies. They are used to create policies. Be sure to name so your team will know what it is in your absence, and you will know what it is a year from now.NoteIf you have worked with ENA by Zayo’s Network Engineers to implement IPv6 policy management on your Firewall, all notes below apply to IPv6 address objects as well.
### Firewall Objects > Addresses
In this section you see both **addresses** and **address groups**. An **address group** can only be created after at least one **address** object is created and mapped to that group. If an **address group** or **address** object is edited, note that this will impact any policies currently installed on your Firewall that reference those components.
Addresses refer to specific entities that are used to represent individual IP addresses, IP subnets, or other IP-related constructs. These object addresses are then utilized within the firewall's configuration, especially in rules and policies, to help streamline and organize traffic management.
An address group is a convenient way to group multiple IP addresses or IP subnets together under a single name or label, allowing for easier and more organized firewall rule management.
The following **Address types** are available to you:
- FQDN
- Geography: These objects are used in policies selecting traffic from specific countries that you would like to allow or block. For more information, please see the geo-blocking help content in the Policies section.
- IP Range
- IP/Netmask
- Wildcard
- Wildcard/FQDN
#### Create an Address Object
1. Select **Addresses** under **Firewall objects**.
2. Expand **Available IPv4 Addresses**.
3. Search for your desired address before creating anything new. You will not be able to create duplicate addresses (same name).
4. If the address doesn’t already exist, select **New IPv4 Address**.
5. Enter address **Name**.
**Name** is the title for the object. **Name** should be something another member of your team or someone at ENA by Zayo can understand in the future when they work on your firewall.
6. Enter address **Description**.
The **Description** is the intended purpose of the address object. **Description** should be something another member of your team or someone at ENA by Zayo can understand in the future when they work on your firewall.
7. Select **Type** and enter the requested information
- FQDN
- Geography
- IP Range
- IP/NetMask
- Wildcard
- Wildcard/FQDN
8. **Add to a group** (optional).
9. Click **Create**.
NoteBe sure to save and install as you work. Until you have clicked Save, all changes made will be lost if you are logged out. Until you have clicked Install, no changes to your Firewall will be in effect, only saved in your workspace and pending install.
### Services
The main idea behind creating a service group is to simplify rule definitions and management. For instance, if a rule should apply to multiple services (like HTTP, HTTPS, and FTP), instead of creating three separate rules or specifying these services individually, one can use a single service group that encompasses all of them.
#### Create a Service
1. Select **Services** under **Firewall objects**.
2. Expand **Available services**.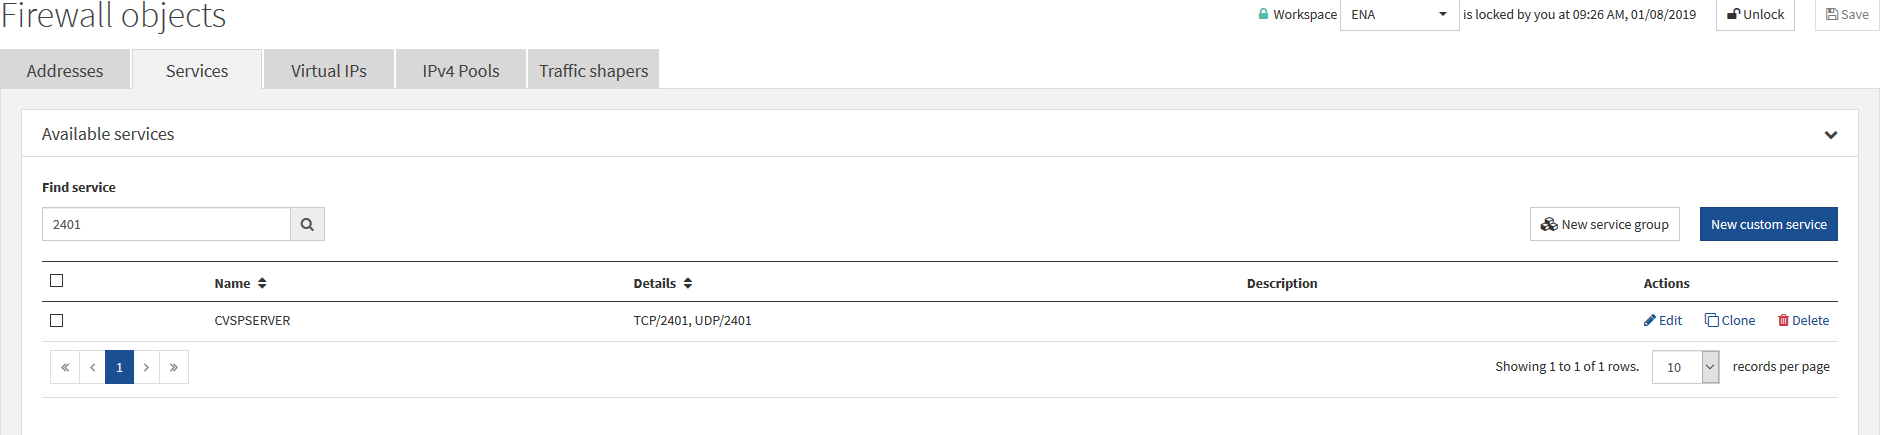
3. Search for service and port before creating anything new. You will not be able to create duplicate services (same name).
4. If the service doesn’t already exist, select **New custom service**.
5. Enter service **Name**.
**Name** is the title for the rule. **Name** should be something another member of your team or someone at ENA by Zayo can understand in the future when they work on your firewall (e.g., Remote Access).
6. Enter address **Description**.
**Description** is the intended purpose of the service object. **Description** should be something another member of your team or someone at ENA by Zayo can understand in the future when they work on your firewall.
7. Select **Protocol type**.
You can create up to 16 port identifiers at once. These are like object groups on some other firewall platforms. If you require more than 16 port identifiers, you’ll need to create multiple serviceswith up to 16 identifiers each and then add each of those services to a **Service group**.
- **Protocol**: Protocol(s) requested
- **Source port**: 1-65535. This will be the inside port from which traffic is coming.
- **Destination Port**: This will be the outside port from which traffic is coming.
8. **Helper** (optional). Typically, this should be set to **auto**.
9. Click **Create**.
NoteBe sure to save and install as you work. Until you have clicked Save, all changes made will be lost if you are logged out. Until you have clicked Install, no changes to your firewall will be in effect, only saved in your workspace and pending install.
### IPv4 Pools
In firewall configurations, IPv4 pools refer to mechanisms used to handle address translations, primarily in the context of Network Address Translation (NAT). These pools provide a set of IP addresses that the firewall can utilize to modify outgoing traffic, ensuring either anonymity, proper routing, or meeting the requirements of an external network.
#### Create IPv4 Pools
1. Select **IPv4 Pools** under **Firewall objects**.
2. Search for your IPv4 Pool before creating anything new. You will not be able to create duplicate services (same name).
3. If the IPv4 Pool doesn’t already exist, select **New IPv4 Pool**.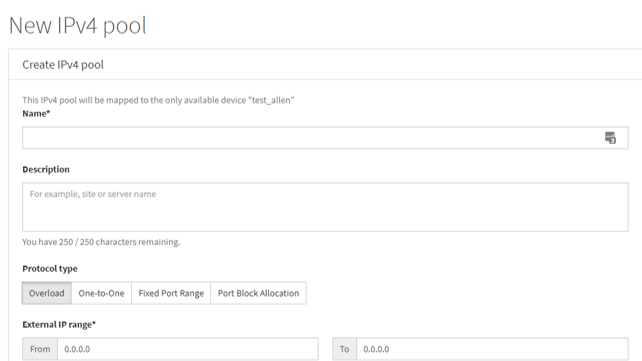
4. Enter IPv4 Pool **Name**.
**Name** should be something another member of your team or someone at ENA by Zayo can understand in the future when they work on your firewall.
5. Enter address **Description** (optional).
The **Description** is the intended purpose of the object. **Description** should be something another member of your team or someone at ENA by Zayo can understand in the future when they work on your firewall.
6. Select **Protocol type**. (optional)
- Overload: This will be the most commonly used type. Sometimes referred to as "Dynamic" on other platforms.
- One-to-One
- Fixed Port Range
- Port Block Allocation
7. Enter the **External IP Range** and any other required information based on the Protocol Type
8. Click **Create**.
NoteBe sure to save and install as you work. Until you have clicked Save, all changes made will be lost if you are logged out. Until you have clicked Install, no changes to your firewall will be in effect, only saved in your workspace and pending install.
## Security Profiles
### Antivirus
Antivirus policies are read-only. These policies can have significant impact on your firewall's performance. When making firewall policies, once you enable the Security Profiles function, you have the ability to turn these antivirus policies on or off to apply to your specific policy.
To change or configure antivirus policies, please contact [CTAC](https://www.ena.com/contact-us/customer-support/) so an engineer can work with you directly.
### Intrusion Prevention (IPS)
IPS policies are read-only. These policies can have significant impact on your firewall's performance. When making firewall policies, once you enable the Security Profiles function, you have the ability to turn these IPS policies on or off to apply to your specific policy.
To change or configure IPS policies, please contact [CTAC](https://www.ena.com/contact-us/customer-support/) so an engineer can work with you directly.
### Application Control
NoteThe firewall service is dynamically updated with new applications found online, but no service is perfect. In order to most effectively filter traffic by application, you must have installed the certificate on your end user devices. Without the certificate, the firewall service cannot properly inspect and identify traffic by a specific application.NoteApplication Control Profiles behave similarly to Firewall Objects. They do not impact your traffic until they are referenced in a policy and that policy is installed to take effect on your network.
#### Create Application Profile
1. Select **Application control** under **Security profiles**.
2. Click **New profile**.
3. Enter application profile **Name**.
**Name** should be something another member of your team or someone at ENA by Zayo can understand in the future when they work on your firewall.
4. Enter **Description** (optional).
The **Description** is the intended purpose of the object. **Description** should be something another member of your team or someone at ENA by Zayo can understand in the future when they work on your firewall.
5. Select the action you’d like to take for **Categories**.
If you have no specific need to **Block** or **Shape** an entire category, the recommendation is to use **Monitor**. ENA will set all categories to default to **Monitor** unless directed otherwise by you. The exception to this is **Botnets**, which will default to **Block**.
6. Set **Application exceptions**.
This section allows you to say that you have one or multiple exceptions to the action you wish to take on a whole category. For example, you may want to block social media, but allow Facebook and Twitter which are sanctioned by your organization.
You can search for items you’d like to exempt in the **Filter Signatures** section at the top left. You can search in any number of ways, shown in the drop-down menu. This can be as simple as choosing **Vendor** or **Name** and searching for a known product (such as Facebook).
You’ll find that many major applications have multiple components that you can act on as a group or individually. For instance, Facebook has 18 components ranging from Like Button to Chat to Video Transfer within Facebook Messenger.
Once found, click **Add Signature(s)** for the items you want to exempt from the action you chose in the **Categories** section.
They will now appear in the next container on the page. You can change the action listed for each of these signatures. Monitor is the best option if you are going to allow the traffic because it ensures logs will be generated.
7. **Filter Overrides**
There may be other ways you want to ensure certain types of traffic are exempt from allow/block rules. This section allows you to filter items based on behavior, protocol, risk, technology, and vendor. This is not required to create an Application control profile.
8. Click **Create**.
Now that you’ve created your profile, you can reference it in a firewall policy. When creating a new firewall policy, if you choose to **Accept** traffic as your performed action, you’ll see that the option to use Security Profiles appears.
NoteBe sure to save and install as you work. Until you have clicked Save, all changes made will be lost if you are logged out. Until you have clicked Install, no changes to your firewall will be in effect, only saved in your workspace and pending install.
### SSL (Secure Socket Layer)/SSH (Secure Shell) Inspection
Individual deep inspection security profiles can be created depending on the requirements of your policy. These specific security profiles can be used to decrypt SSL and the typical use case is to protect specific servers. To apply this level of deep packet inspection, you must first create an SSL/SSH profile and then apply it to a firewall policy.
#### Create Your SSL/SSH Profile
1. Select **SSL/SSH inspection** under **Security Profiles**.
2. Click **New profile**.
3. **Name** your profile.
**Name** should be something another member of your team or someone at ENA by Zayo can understand in the future when they work on your firewall.
4. Enter **Description** (optional).
The **Description** is the intended purpose of the object. **Description** should be something another member of your team or someone at ENA by Zayo can understand in the future when they work on your firewall.
5. Select the **Protecting SSL Server certificate**.
#### To Apply SSL/SSH Scanning to a Policy
1. Create new firewall policy or open edit tool for an existing policy.
2. Action must be **Accept** or **IPSEC**.
3. Turn Security Profiles **ON**.
4. Choose a profile from the **SSL/SSH Inspection** drop-down.NoteYou may also create a profile from here by clicking to the right of the **SSL/SSH Inspection** drop-down.
5. Click **Save**.
## Policies
A firewall policy is a defined set of instructions or criteria that dictates how a firewall should handle network traffic based on specified attributes. These policies form the backbone of a firewall's operation, ensuring that network traffic is handled appropriately based on security needs and organizational objectives.
#### Firewall
NoteIf you have worked with Network Engineering to activate IPv6, these instructions will apply to that section as well.
To make a new firewall policy, a few steps are required. Completing the steps below will enable you to create a policy that will filter traffic.
1. Create Source or Destination IP.
2. Create Services.
3. Create your Firewall Policy.
NoteRemember, before you can create anything, you must lock your workspace.NoteBe sure to save and install as you work. Until you have clicked Save, all changes made will be lost if you are logged out. Until you have clicked Install, no changes to your firewall will be in effect, only saved in your workspace and pending install.
#### Create Source or Destination IP
1. Select **Addresses** under Firewall objects.
2. Expand **Available IPv4 addresses**.
3. Search for IP/Network before creating anything new. You will not be able to create duplicate services (same name).
4. If the address doesn’t already exist, select **New IPv4 address**.
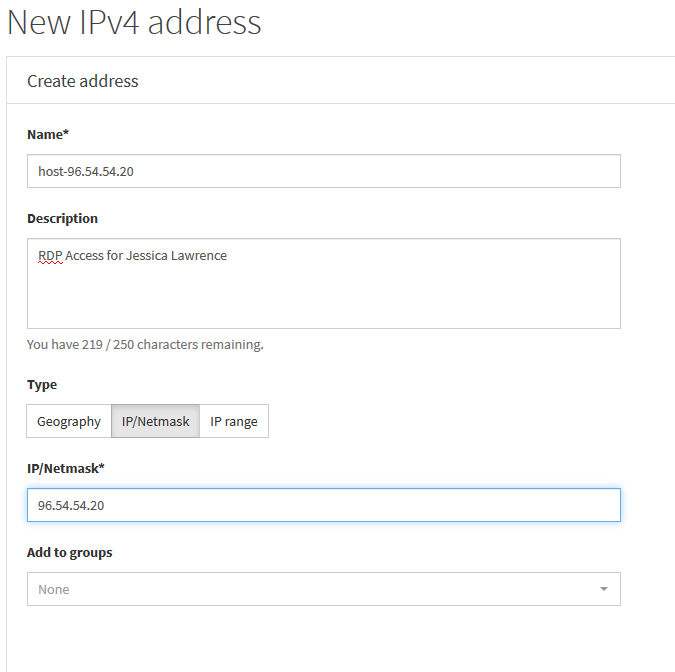
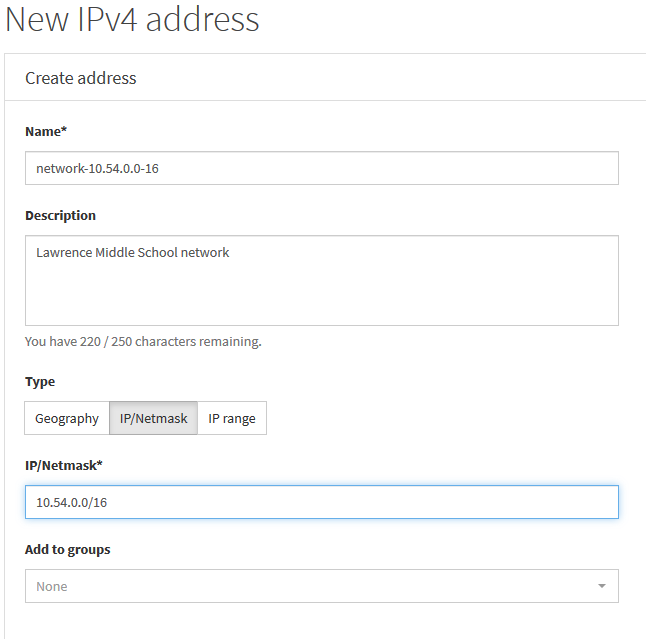
5. Enter **Name**.
**Name** should be something another member of your team or someone at ENA by Zayo can understand in the future when they work on your firewall.AlertDo not name your Address object the IP address only. Use identifiers like “host,” “network,” “service,” etc. to ensure the object is used correctly in the future.
6. Enter address **Description** (optional).
The **Description** is the intended purpose of the object. **Description** should be something another member of your team or someone at ENA by Zayo can understand in the future when they work on your firewall (e.g., Remote access).
7. Select **IP/Netmask** from **Type**.
8. Enter **IP/Netmask**. Use host's IP if there is no network.
9. Leave **Add to groups** blank.
10. Click **Create**.
NoteYou must create one IP/Network for each direction.
**Example: External / Public IP Address**
**Example: Internal / Private IP Network**
#### Create Services
1. Select **Services** under **Firewall objects**.
2. Expand **Available services**.
3. Search for service and port before creating anything new. You will not be able to create duplicate services (same name).
4. If the service doesn’t already exist, select **New custom service**.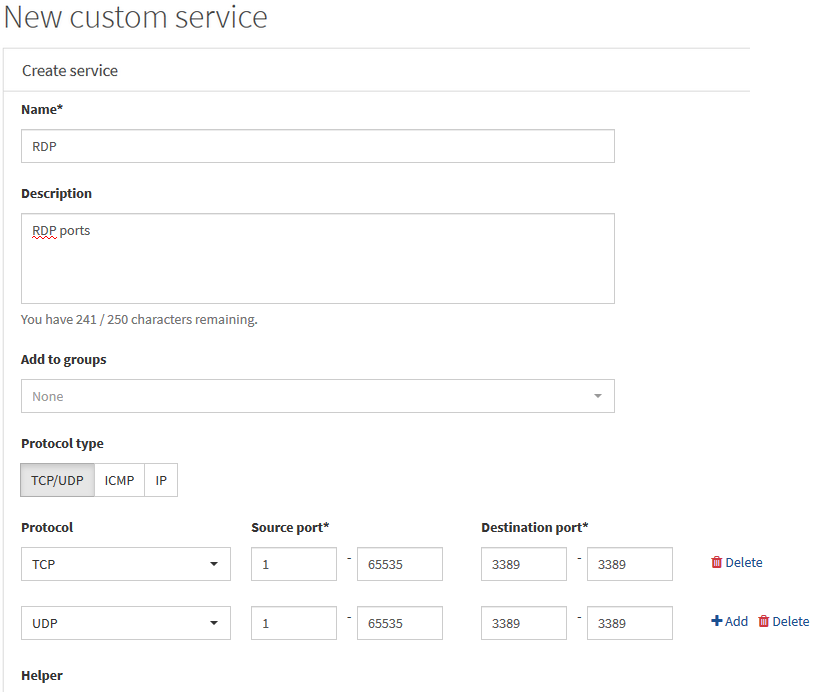
5. Enter service **Name**.
**Name** is the title for the rule. **Name** should be something another member of your team or someone at ENA by Zayo can understand in the future when they work on your firewall (e.g., Remote Access).
6. Enter address **Description**.
The **Description** is the intended purpose of the service object. **Description** should be something another member of your team or someone at ENA by Zayo can understand in the future when they work on your firewall.
7. Select **Protocol type**. Protocol type = Protocol requested.
You can create up to 16 port identifiers at once (these are like object groups in ASAs). If you require more than 16 port identifiers, you’ll need to create multiple services with up to 16 identifiers each and then add each of those services to a **Service group**.
- **Protocol**: Protocol(s)requested
- **Source port**: 1-65535. This will be the inside port from which traffic is coming.
- **Destination Port**: This will be the outside port from which traffic will be coming.
8. **Helper** (optional). Set to **auto**.
9. Click **Create**.
NoteBe sure to save and install as you work. Until you have clicked **Save**, all changes made will be lost if you are logged out. Until you have clicked **Install**, no changes to your Firewall will be in effect, only saved in your workspace and pending install.
#### Create Your Policy
### Source NAT
NoteSource NATs are based off the Source IP Address. They are sometimes called “Dynamic NATs” on other platforms.NotePublic and Private IP address objects will each need to be created separately and linked together in a final policy. They are not automatically created as symmetrical.
#### Create Private IP Address Object
1. Select **Addresses** under **Firewall objects**.
2. Expand **Available IPv4 addresses**.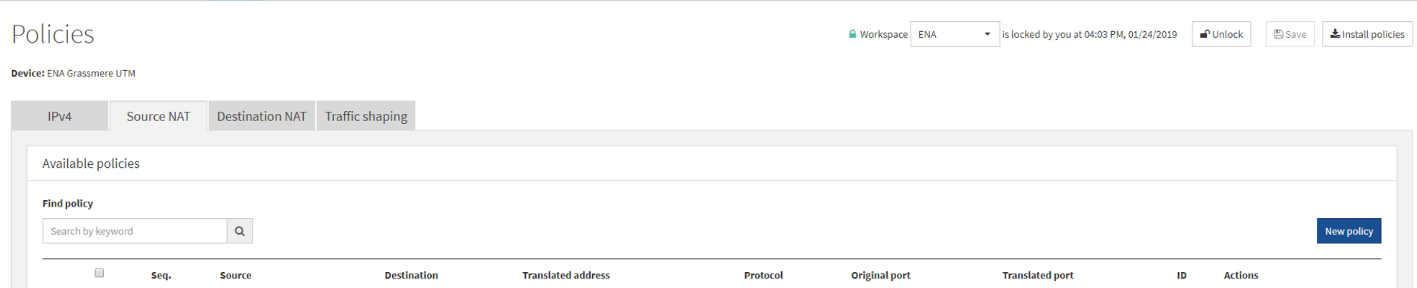
3. Search for existing IP/Network before creating anything new. You will not be able to create duplicate services (same name).
4. If the service doesn’t already exist, select **New IPv4 address**.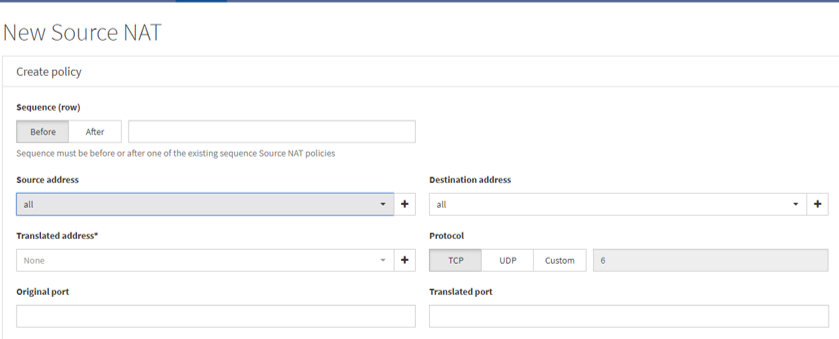
5. Enter address **Name**.
**Name** should be something another member of your team or someone at ENA by Zayo can understand in the future when they work on your firewall.AlertDO NOT name your Address object the IP address only. Use identifiers like “host,” “network,” “service,” etc. to ensure the object is used correctly in the future
6. Enter address **Description**.
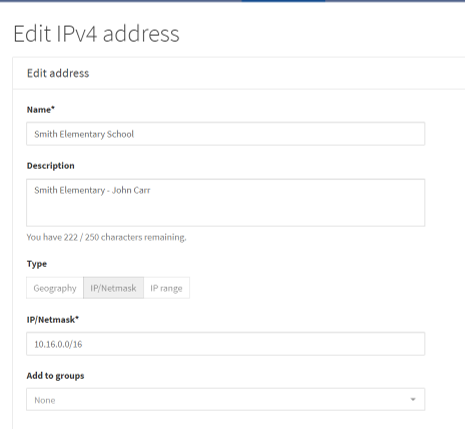
**Description** should be something another member of your team or someone at ENA by Zayo can understand in the future when they work on your firewall (e.g., Smith Elementary).
7. Under **Type**, select **IP/Netmask**.
8. Enter **IP/Netmask**.
9. Click **Create**.
NoteBe sure to save and install as you work. Until you have clicked **Save**, all changes made will be lost if you are logged out. Until you have clicked **Install**, no changes to your Firewall will be in effect, only saved in your workspace and pending install.
### Destination NAT
NoteDestination NATs are sometimes called “Static NATs” on other platforms. Destination NATs will translate traffic from a specific internal host to the internet and allow traffic from specified points of the internet to access that host.
To create a Source NAT Policy, you will need both a Private IP and Public IP. These will be created as separate objects and then linked together in a policy. Any hosted-based Source NAT will be able to reach out to the internet, but the internet will not be able to reach that host.
#### Create Private IP Address Object
1. Click **Addresses** in the **Firewall objects** drop-down.
2. Expand **Available IPv4 addresses**.
3. Search for address before creating anything new. You will not be able to create duplicate addresses (same name).
4. If the address doesn't already exist, click **New IPv4 address**.
5. Enter **Name**
**Name** should be something another member of your team or someone at ENA by Zayo can understand in the future when they work on your firewall.AlertDO NOT name your Address object the IP address only. Use identifiers like “host,” “network,” “service,” etc. to ensure the object is used correctly in the future
6. Enter address **Description**.
The **Description** is the intended purpose of the object. **Description** should be something another member of your team or someone at ENA by Zayo can understand in the future when they work on your firewall (e.g., Smith Elementary School).
7. Select **IP/Netmask** from **Type**.
8. Enter **IP/Netmask**. Use host's IP if there is no network.
9. Click **Create**.
NoteBe sure to save and install as you work. Until you have clicked **Save**, all changes made will be lost if you are logged out. Until you have clicked **Install**, no changes to your Firewall will be in effect, only saved in your workspace and pending install.
#### Create Public IP Address Object (IPv4 Pool)
1. Click **IPv4 Pools** in the **Firewall objects** drop-down.
2. Expand **Available IPv4 addresses**.
3. Search for address before creating anything new. You will not be able to create duplicate addresses (same name).
1. If the address doesn't already exist, click **New IPv4 pool**.
2. Enter **Name.**
**Name** should be something another member of your team or someone at ENA by Zayo can understand in the future when they work on your firewall.AlertDO NOT name your Address object the IP address only. Use identifiers like “host,” “network,” “service,” etc. to ensure the object is used correctly in the future
3. Enter address **Description** (optional).
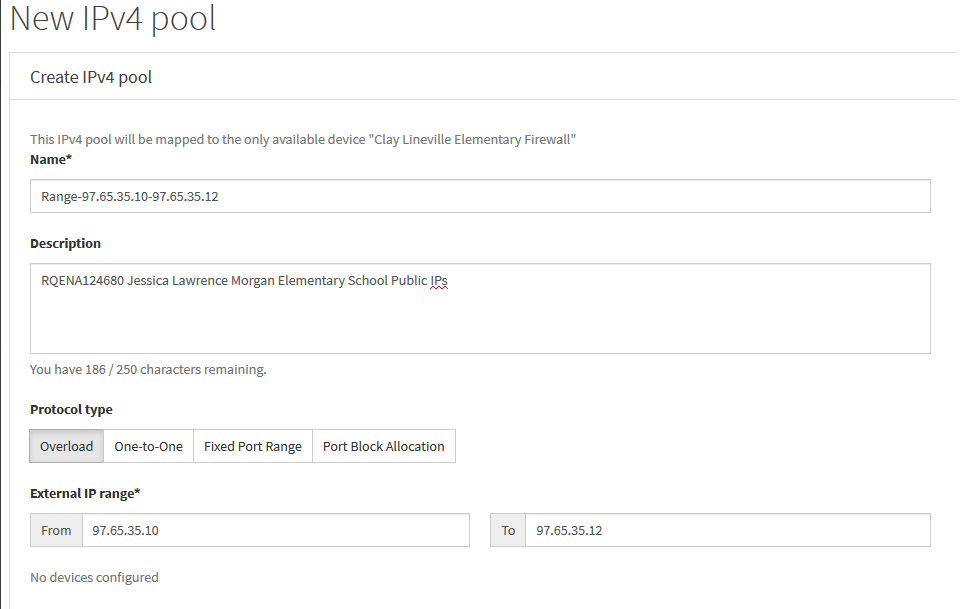
**Description** should include reason for creating, who is creating, and/or ticket number.
4. For **Protocol Type**, choose **Overload** for Dynamic NATs and **One-to-One** for Static NATs
5. Enter Public IP/IP range/Network in **External IP range**.
6. Click **Create**.
NoteBe sure to save and install as you work. Until you have clicked **Save**, all changes made will be lost if you are logged out. Until you have clicked **Install**, no changes to your Firewall will be in effect, only saved in your workspace and pending install.
### Traffic Shaping
There are two ways to enable traffic shaping on your network – through a traffic shaping policy or by applying traffic shapers to a firewall policy. To accomplish either, you’ll need to create your traffic shaper(s) first.
#### Creating Traffic Shaper Objects
When creating a new shaper, you’ll need to choose **shared shaper** or **per-IP shaper**.
**Per-IP** shapers limit traffic for each individual IP hitting the policy with the shaper applied.
**Shared shapers** apply to all users hitting a policy, and a traffic limit can be applied in one of two ways:
- Limit traffic to each policy using the shaper
- Limit total traffic affected by the shaper (regardless of how many policies use it)
#### Creating a Shared Shaper
1. Select **Traffic Shapers** under **Firewall objects**.
2. Expand **Available shared traffic shapers**.
3. Search for the shaper you want before creating anything new. You will not be able to create duplicate services (same name).
4. If the shaper doesn’t already exist, select **New shared traffic shaper**.
5. Enter shaper **Name**.
**Name** should be something another member of your team or someone at ENA by Zayo can understand in the future when they work on your firewall (e.g., Staff 10Mbps).
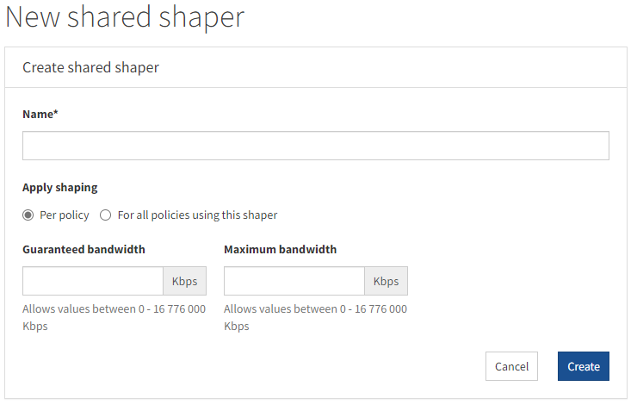
6. Select whether the shaping will be **Per policy** or shared across **all policies using this shaper**.
Example: If you create a 100mbps shaper and select **Per policy**, 100mbps would be granted to Netflix and Facebook *each*. If you create a 100mbps shaper and select **all policies using this shaper**, 100mbps *total* will be granted for both Netflix and Facebook.
7. Select **Bandwidth unit**.
8. Set the **Guaranteed** and/or **Maximum Bandwidth** for this policy. Be sure to correctly set the units you want.
9. Click **Create**.
The shaper in the example below will limit traffic the same for each policy using this shaper. Traffic will be limited to a maximum of 10mbps but guaranteed at least 5mbps. Therefore, if the shaper is applied to both Facebook and Twitter, both applications will be guaranteed at least 5mbps.
NoteBe sure to save and install as you work. Until you have clicked **Save**, all changes made will be lost if you are logged out. Until you have clicked **Install**, no changes to your Firewall will be in effect, only saved in your workspace and pending install.
#### Creating a Per-IP Shaper
1. Select **Traffic Shapers** under **Firewall objects**.
2. Expand **Available per IP-traffic shapers**.
3. Search for the shaper you want before creating anything new. You will not be able to create duplicate services (same name).
4. If the shaper doesn’t already exist, select **New per-IP traffic shaper**.
5. Enter shaper **Name**.
**Name** should be something another member of your team or someone at ENA by Zayo can understand in the future when they work on your Firewall (e.g., 15Mbps Max).
6. Specify **Maximum bandwidth** and set bandwidth unit. (optional)
7. Specify **Maximum Concurrent Connections**. This is the number of tabs a user can have open at once. (optional)
8. Click **Create**.
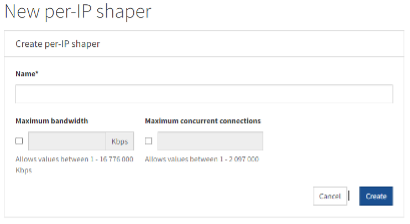
NoteBe sure to save and install as you work. Until you have clicked **Save**, all changes made will be lost if you are logged out. Until you have clicked **Install**, no changes to your Firewall will be in effect, only saved in your workspace and pending install.
#### Referencing Shaper Policies
Once created, you’ll need to build a policy that references this shaper. Typically, this will be done while creating Firewall Policy. To reference a shaper policy:
1. Select **IPv4** under **Policies**.
2. Click **Edit** for an existing Firewall Policy or click **Create new**.
3. Scroll to the bottom of the policy and select the shaper.
- **Shared shaper** applies the shared shaper to outbound traffic (e.g., traffic coming from Netflix).
- **Reverse shaper** applies the shared shaper to inbound traffic (e.g., traffic going to Netflix).NoteReverse Traffic Shaping applies your policy to traffic coming into your network. You’ll want to use this if trying to limit certain applications at schools, such as video streaming.
- **Per-IP shaper** applies the per-IP shaper to any traffic hitting that policy
4. Click **Save**.
NoteYou may also create a profile from here by clicking to the right of the **SSL/SSH Inspection** drop-down.
### Geo-Blocking
Creating policies to allow/deny traffic based on the country of origin is easy with you Managed Firewall service. Before making these policies, consider a few key items:
- While there are countries that you can fairly confidently make assumptions about—the countries in which major corporations avoid building data centers and hosting services for political reasons—many others will surprise you. Microsoft or Amazon may have data centers in unexpected places. These major companies move their traffic around all the time for load balancing and other reasons. If you over-block traffic from around the world, you may have unexpected impacts to your network when that traffic moves around.
#### Create Geo-Blocking Policy
NoteFor best quality, please clickto view the video below in full screen mode.
[Video](https://cdn.us.document360.io/ed04ecbf-0868-4e77-a11e-6df8b843143d/Images/Documentation/ENA_Netshield_UTM_Geo-blocking_captionUnder.mp4?sv=2026-02-06&spr=https&st=2026-11-12T13%3A05%3A22Z&se=2026-11-12T14%3A05%3A22Z&sr=c&sp=r&sig=IRMSvNqjFWbxSho%2FmeQifMS1CVGBoOJhoxOh9hRBN%2Fc%3D)
1. Select **Addresses** under **Firewall objects**.
2. Expand **Available IPv4 addresses**.
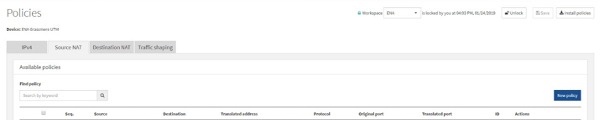
3. Search for existing IP/Network before creating anything new. You will not be able to create duplicate services (same name).
4. If the service doesn’t already exist, select **New IPv4 address**.
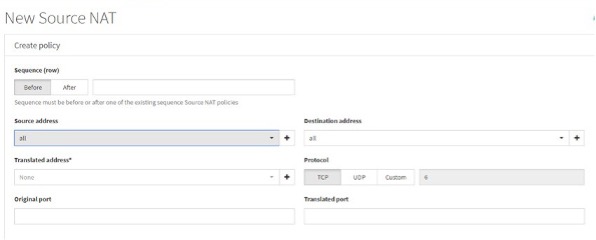
5. Enter address **Name**.
**Name** should be something another member of your team or someone at ENA by Zayo can understand in the future when they work on your firewall.
6. Enter address **Description**.
**Description** should be something another member of your team or someone at ENA by Zayo can understand in the future when they work on your firewall.
7. Under **Type**, select **Geography**.
8. Select the country you would like to include in this object.
You can only choose one country at a time.
To block multiple countries, create an Address Group with a name like “Geo-block” or “Blocked Countries.” Then each time you create an Address Object for a country, you can add it to your group immediately. Now, when you build your policy that references those objects, you can simply select the group, instead of each individual object.
9. Click **Create**.
10. Next, navigate to **IPv4 Policies** in the **Policies** section.
11. Create a new firewall policy that references your country-based objects as you would like. Make sure to choose your source and destination interfaces carefully. Select **Enable** under **Log Violation Traffic**, so that any time traffic related to that country does occur on your network, your logs will give you the information you need to address that activity.
NoteBe sure to save and install as you work. Until you have clicked **Save**, all changes made will be lost if you are logged out. Until you have clicked **Install**, no changes to your Firewall will be in effect, only saved in your workspace and pending install.
### Block VPN
NoteYour service is dynamically updated with new applications found online, but no service is perfect. In order to most effectively block VPNs, you must have installed the certificate on your end-user devices. Without the certificate,the service will not be able to properly inspect and identify traffic as a VPN.
Application control profiles behave similarly to Firewall objects. They must be referenced by a policy to impact traffic. To create an application control profile:
1. Select **Application control** under **Security profiles**.
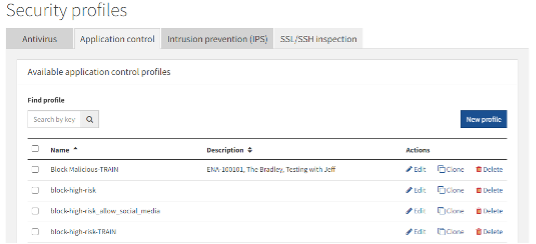
2. Search for existing application control profiles before creating anything new. You will not be able to create duplicate services (same name).
3. If the service doesn’t already exist, select **New profile**.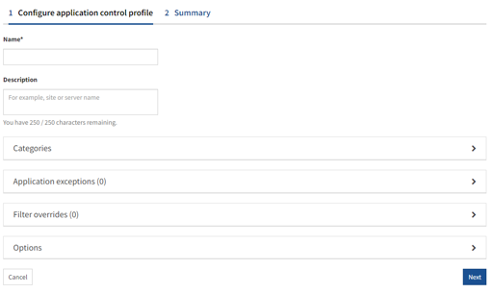
4. Enter application control profile **Name**
**Name** should be something another member of your team or someone at ENA by Zayo can understand in the future when they work on your firewall.
5. Enter application control profile **Description**.
**Description** should be something another member of your team or someone at ENA by Zayo can understand in the future when they work on your firewall.
6. Click **Categories**.
7. Click the **Remote Access** category and choose the desired action (most likely, block). 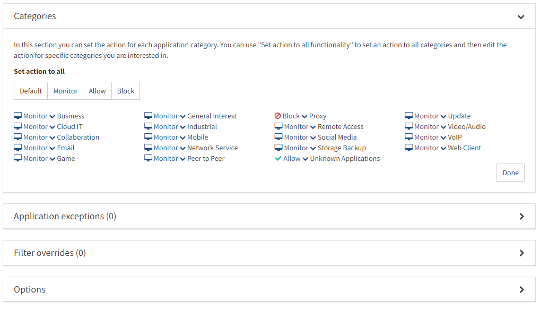
8. Click **Done**.
9. Click **Application exceptions**.
You see all the Remote Access applications within the Remote Access category. If you have no intended exceptions to this rule, you’re finished and can hit **Create** at the bottom of the page.
10. If you have any VPN products that should be approved, click **Add signature** for the items you want to except from being blocked.
You can search for VPN products using **Filter signatures**. Select a filter from the first drop-down. Use the secondary filter that appears if you need to further refine your search.
11. Once found, click **Add signature** for the items you want to except from being blocked.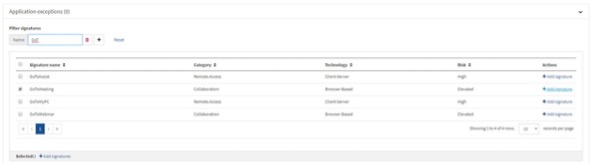
12. The item appears in a new container. You can change the action listed for each of these signature.
13. Click **Done**.
14. Move to **Filter Overrides** and create a filter with the **Behavior** of **Tunneling**. Add these signatures to create an additional filter.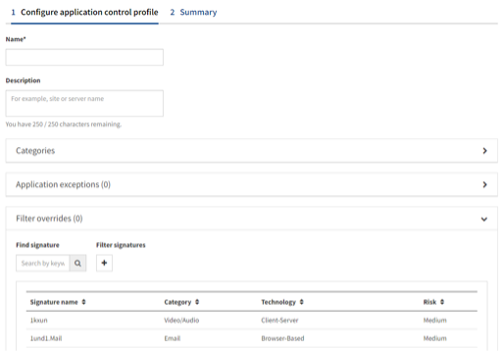Now that you’ve created your profile, you can reference it in a firewall policy. When creating a new firewall policy, if you choose **Accept traffic** as your performed action, you see the option to use security profiles.
You’ll be able to apply your application control profile once this is turned **ON**.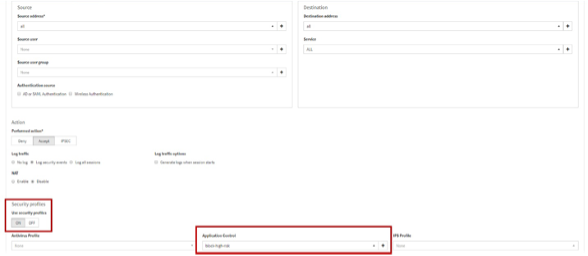
NoteBe sure to save and install as you work. Until you have clicked **Save**, all changes made will be lost if you are logged out. Until you have clicked **Install**, no changes to your Firewall will be in effect, only saved in your workspace and pending install.
### Block Social Media Application(s)
NoteYour service is dynamically updated with new applications found online, but no service is perfect. In order to most effectively filter traffic by application, you must have installed the certificate on your end user devices. Without the certificate, the service will not be able to properly inspect and identify traffic a specific application.
Application control profiles behave similarly to Firewall objects. They must be referenced by a policy to impact traffic.
#### Create Application Control Profile
1. Select **Application control** under **Security profiles**.
2. Search for existing application control profiles before creating anything new. You will not be able to create duplicate services (same name).
3. If the service doesn’t already exist, select **New profile**.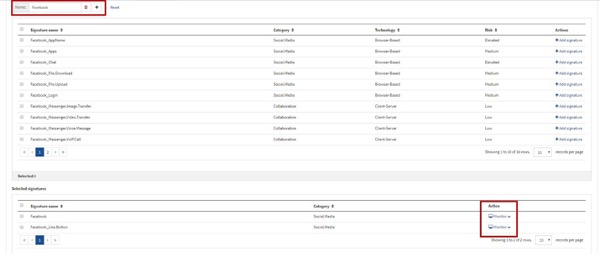
4. Enter application control profile **Name** that will make sense to others managing your firewall.
5. Enter application control profile **Description**.
**Description** should be something another member of your team or someone at ENA by Zayo can understand in the future when they work on your firewall.
6. Click **Categories**.
7. Click the **Social Media** category and choose the desired action (most likely, block).
8. Click **Done**.
9. Click **Application exceptions**.
You see all the applications within the Social Media category. If you have no intended exceptions to this rule, you’re finished and can hit **Create** at the bottom of the page.
10. If you have any applications that should be approved, click **Add signature** for the items you to except from being blocked.
You can search for applications using **Filter signatures**. Select a filter from the first drop-down. Use the secondary filter that appears if you need to further refine your search.
You’ll find that many major applications have multiple components that you can act on as a group or individually. For instance, Facebook has 18 components ranging from Like Button to Chat to VideoTransfer within FacebookMessenger.
11. Once found, click **Add signature** for the items you want to except from being blocked.
12. The item appears in a new container. You can change the action listed for each of these signatures.
13. Click **Filter Overrides**. (optional)
There may be other ways you want to override your core rule. This section allows you to filter items based on behavior, protocol, risk, technology, and vendor. This is not required to create an Application control profile.
14. Click **Done**.
#### Reference Application Control Profile
Now that you’ve created your profile, you can reference it in an firewall policy. When creating a new firewall policy, if you choose to **Accept traffic** as your performed action, you’ll see that the option to use Security Profiles appears.
You’ll be able to apply your Application control profile once this is turned **ON**.
NoteBe sure to save and install as you work. Until you have clicked **Save**, all changes made will be lost if you are logged out. Until you have clicked **Install**, no changes to your Firewall will be in effect, only saved in your workspace and pending install.
## VPN
### Site-to Site-VPN
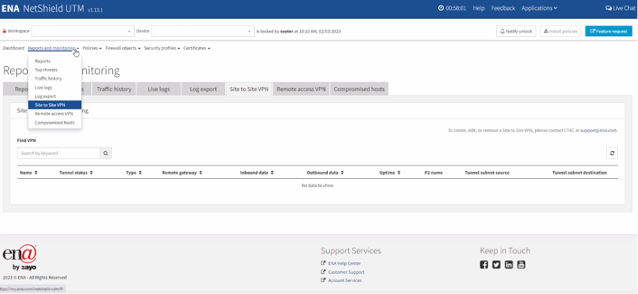
This section allows you to check the status of any existing site-to-site VPN tunnels. You’ll be able to see tunnel status, incoming data, uptime, and other details. Managed Firewall customers do not have the ability to create, delete, or change site-to-site VPN tunnels. To do so, please contact [CTAC](https://www.ena.com/contact-us/customer-support/).
### Remote Access VPN
Remote access VPN is an included feature of your Managed Firewall service. This VPN supports all major operating systems. If you experience issues with the client or connection, please contact [CTAC](https://www.ena.com/contact-us/customer-support/). To create a remote access VPN in your portal, you do the following:
- Create a portal profile
- Create a remote access VPN
- Create a policy rule
#### Create Portal Profile
1. Select **Addresses** from **Firewall objects** drop-down.
2. Open **Available IPv4 addresses** and click **New IPv4 address**.
3. For **Type**, select **IP range** to identify which IP address should be assigned to the client's machine when on the VPN.
4. Enter **IP range**.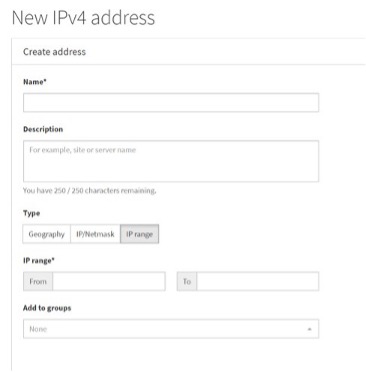
5. Create one or more Address objects of **Type IP/Netmask** to identify which networks should be routed over the VPN (Split Tunneling).
6. If more than one address object is needed for routing over the VPN, then create an address-group to group the subnets together.
7. If not already present, add a CA (or identity) certificate for the VPN to use for remote access VPN.
To upload a CA certificate, select **Import** under the **CA Certificates** section of your workspace.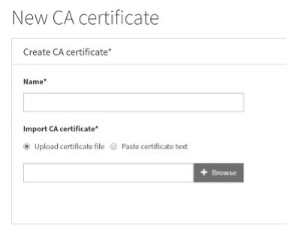
8. Select **Remote access VPN** from **Firewall objects** drop-down.
9. Click **New portal profile**.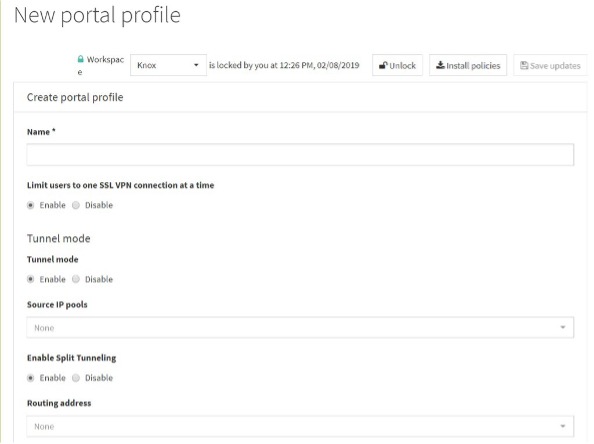
10. **Name** your portal and set **Tunnel Mode** to **Enable**.
11. For **Source IP Pools** choose the address object you made earlier that is a range of IP addresses to assign to the client device.
12. Set **Enable split tunneling** to **Enable** and choose the address object or address group that you made earlier to identify subnets that should be routed over the tunnel.
13. Click **Create**.
#### Create New Remote Access VPN
1. Click **New remote access VPN**.NoteOnly one Remote Access VPN is permitted per device. If you have dual egress, you may have two devices from which to choose.
2. Choose the **Device** to be configured.
3. Select **Listen on interface(s)** usually this will be **Any**.
4. Select **Listen on port**, for best performance 443 should be selected.
5. Select whether you want to **Restrict access** to specific hosts.
6. Choose the desired **Server certificate**.
7. In Address Range, choose **Automatically assign addresses** in order to use what is defined in the portal profile or **Specifies custom IP** range to assign everyone that connects to a specific IP range .
8. Set the **DNS server** to the your domain controller or internal DNS servers.
9. Under **Authentication/Portal Mapping** assign a portal profile to the user group you created earlier.
10. Click **Create**.
#### Create Policy to Allow Access
1. Select Firewall Policy from Policies drop-down.
2. Create a firewall policy to allow access from the client VPN IP space to the target devices you want to allow the VPN to talk to. Usually, these are the subnets you added for split tunneling but could be more specific.